Many people encounter issues when setting up a Mosquitto MQTT Bridge with Flespi MQTT Broker. Here are several key points to consider:
1. You must have a properly configured token (the ACL should allow all the topics you plan to work with).
For our example, we will configure the token to allow:
`publish` messages to the topics `my/custom/out/topics/#`
and
`publish` and `subscribe` to the topics `some/topics/for/both/directions/#`.

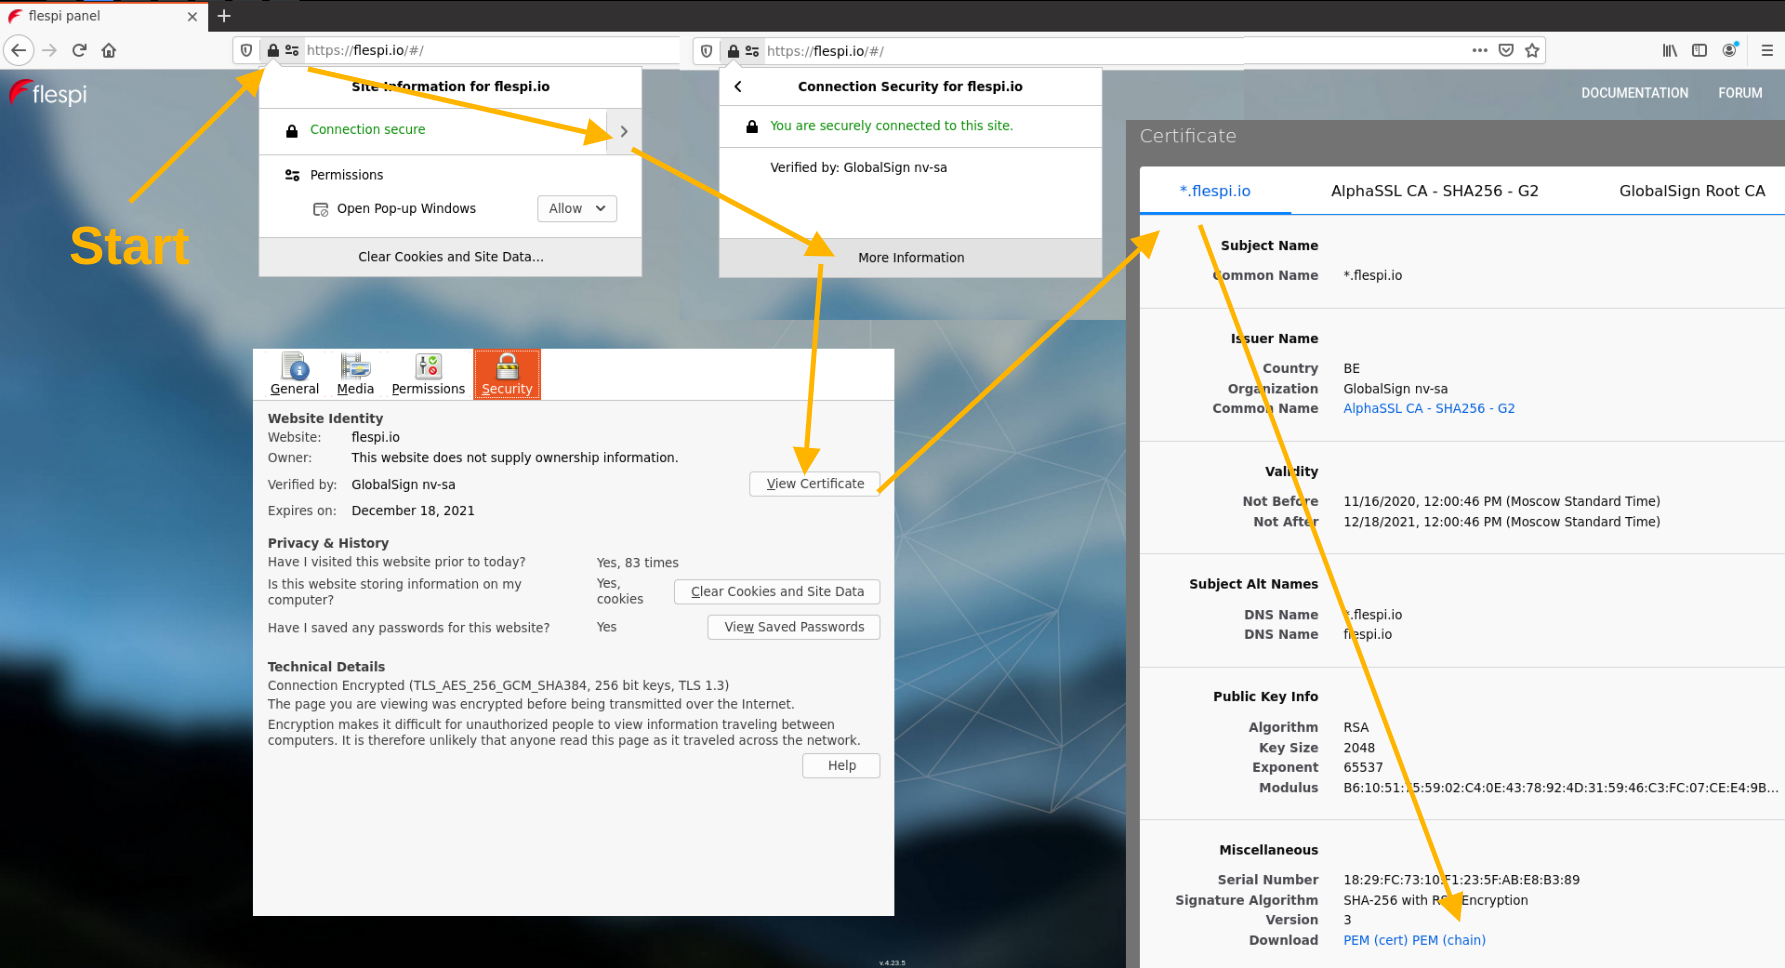
2. You need to obtain the correct certificate chain for the flespi.io domain.
a. This can be done using a browser:
1. Open flespi.io
2. Click the button to the left in the address bar:
Chrome: View site information -> Connection is secure -> Certificate is valid -> Details -> First element in Certificate Hierarchy -> Export -> Type: Base64-encoded ASCII, Certificate chain -> Name: flespi-chain.pem
Firefox: Lock icon -> Connection secure -> More information -> Security -> View Certificate -> Miscellaneous -> Download: PEM (chain) -> Name: flespi-chain.pem
3. Now you have the necessary certificate chain as a PEM file.
b. Or using a bash command:
echo -n | openssl s_client -showcerts -connect flespi.io:443 2>/dev/null | awk '/-----BEGIN CERTIFICATE-----/,/-----END CERTIFICATE-----/' > ./flespi-chain.pem
3. You need to properly configure the bridge:
# mosquitto <-> Flespi bridge
connection mosquittoFlespi
bridge_protocol_version mqttv50
bridge_cafile ./flespi-chain.pem
bridge_tls_version tlsv1.3
bridge_insecure false


protocol mqtt
address mqtt.flespi.io:8883
clientid mosquitto_flespi
remote_username YOUR_TOKEN_HERE
try_private false
notifications true
notification_topic notification/bridge
keepalive_interval 60
start_type automatic
restart_timeout 10 180
topic flespi/# in
topic my/custom/out/topics/# out
topic some/topics/for/both/directions/# both
In the configuration, we recommend paying attention to several key parameters:
bridge_cafile ./flespi-chain.pem - specify the full path to the certificate chain file here
clientid mosquitto_flespi        - specify the client ID here
remote_username YOUR_TOKEN_HERE  - replace YOUR_TOKEN_HERE with your Flespi token
The following lines show an example of how to configure message forwarding by the bridge in different directions:
topic flespi/# in                                - mosquitto <== flespi
topic my/custom/out/topics/# out                 - mosquitto ==> flespi
topic some/topics/for/both/directions/# both     - mosquitto <=> flespi
That's it. Now you can run Mosquitto with this configuration:
mosquitto -c ./mosquitto.conf -v
To verify that Mosquitto correctly connected to flespi MQTT Broker navigate to MQTT -> Sessions. There you can see a list of currently active MQTT Sessions. If you do not see Mosquitto session in the list open MQTT -> MQTT Logs to check if there were any connections attempts at all.
Finally you can sniff MQTT messages between flespi and your Mosquitto using MQTT Board application. Just subscribe to both topics and you will be able to track all published MQTT messages.
Troubleshooting:
1. Check Your Token Permissions:
Ensure that your token allows subscribing and publishing to the required topics. For initial bridge setup, we recommend starting with a master token that has full permissions. Once the bridge is operational, you can switch to an ACL token and configure it according to your needs.
2. Verify the Certificate Chain:
You might be using an incorrect certificate chain. Double-check that you have saved the correct certificate chain.
3. Review the Mosquitto Log:
Reread the initial messages in the Mosquitto log, as they often correctly describe the problem.