The latest update of the flespi panel brought a long-awaited feature to the public — users can now enable third-party websites to access their flespi token for authentication. Now obtaining the flespi token is easier than ever.
The browsers of today allow tabs to “communicate” with one another — i.e. transfer certain data. This is the capability we relied on to implement authentication via flespi.
All you need is subscribe to messages from other pages on your page, get a list of authentication links, and add the links to the necessary social media for authentication in flespi.
To open the authentication page, we suggest the following code:
function openUrl (url, title) {
  title = title || 'auth'
  var w = 500, h = 600
  var screenLeft = window.screenLeft !== undefined ? window.screenLeft : screen.left
  var screenTop = window.screenTop !== undefined ? window.screenTop : screen.top
  var width = window.innerWidth ? window.innerWidth : document.documentElement.clientWidth ? document.documentElement.clientWidth : screen.width
  var height = window.innerHeight ? window.innerHeight : document.documentElement.clientHeight ? document.documentElement.clientHeight : screen.height
  var left = ((width / 2) - (w / 2)) + screenLeft
  var top = ((height / 2) - (h / 2)) + screenTop
  var newWindow = window.open(url, title, 'toolbar=no,location=no,status=yes,resizable=yes,scrollbars=yes, width=' + w + ', height=' + h + ', top=' + top + ', left=' + left)
  if (window.focus) {
    newWindow.focus()
  }
}
The code above will open a new dialog at the center of the screen with no browser navigation elements.
Now let’s add the listener for messages from other pages.
Note! It’s important to check all messages since any window/tab/iframe open via a link can send a message, and the message may contain a random string.
window.addEventListener('message', function (event) {
  if (typeof event.data === 'string' && ~event.data.indexOf('FlespiToken')) {
    alert(event.data); // do some magic (whatever you want)
  }
})
Links to available social networks are available via the following GET request to https://flespi.io/auth/oauth/providers
var req = new XMLHttpRequest()
req.open('GET', 'https://flespi.io/auth/oauth/providers', true);
req.onreadystatechange = function() {
  if (req.readyState == 4) {
    if(req.status == 200) { // waiting for status 200
      var response = JSON.parse(req.responseText)
      Object.keys(response.result[0]).forEach(function(key,index) {
        // create buttons and puts them to page
        var div = document.createElement('div');
        div.innerHTML = key;
        div.className = 'button';
        div.onclick = function(e) {
          openUrl(response.result[0][key])
        };
        document.body.appendChild(div);
      });
      // also create a button to authorize user through email and password
      var div = document.createElement('div');
      div.innerHTML = 'email';
      div.className = 'button';
      div.onclick = function(e) {
        openUrl('https://flespi.io/#/login/')
      };
      document.body.appendChild(div);
    }
  }
};
req.send(null);
Having executed the request you will get a result formatted as a JSON object:
{
     "facebook": "https://www.facebook.com/dialog/oauth?...",
     "github": "https://github.com/login/oauth/authorize?...",
     "google": "https://accounts.google.com/o/oauth2/auth?....",
     "live": "https://login.live.com/oauth20_authorize.srf..."
}
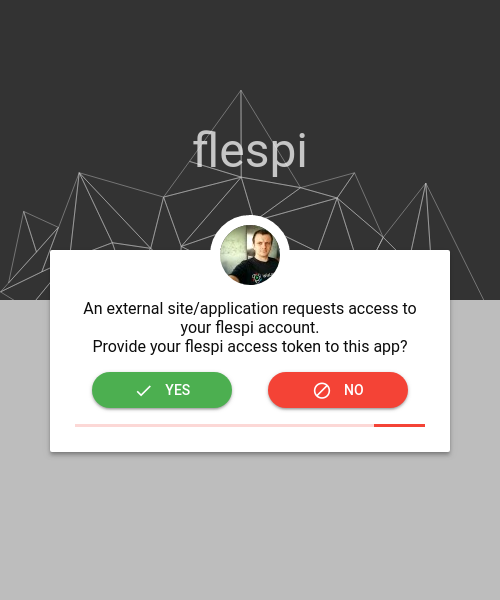
With all the above steps done, when the user clicks the link, they will see the flespi authentication (via the selected social network or email/password). After that, the user needs to explicitly agree to provide the flespi access token to an external application:
If the user agrees, flespi token gets into the message listener on your page and is available for use at your discretion. If the user denies access, the authentication page will close and the flespi token will not make it to your page.
The example project is available on GitHub for anyone interested.
