All of us sometimes face routine tasks that we don’t want to invest the time into. In these cases, we try to come up with the ways to automate them, minimize the frequency you have to readdress the issue, and free up some time for sublime matters.
Cure for the frontender’s pain
One of the common frontend tasks consuming a lot of resources is the fill-up forms. If, for instance, you take SetBox, it contains hundreds of different forms. Implementing them all manually will take ages and will kill the developer’s enthusiasm altogether.
We decided to automate the process of forms creation and the frontend architecture we follow is favorable for such an initiative.
The foundation of our REST framework is represented by the configuration containing the description of the data format as a JSON Schema.
At some point in time, we researched the existing solutions for forms generation and were really upset with the results — some options were heavily hardcoded and couldn't be applied to our schemas, while others were simply obsolete and required a disproportionate amount of effort for tweaking and adaptation. Besides, our apps rely on Vue and Material Design, so we decided to go for our own implementation of the form generator.
Now all our forms are generated automatically — what’s needed is to feed the proper schema, which in most cases is a configuration file. Then we thought that we can create a small app with own API that will simplify life for us as well as for fellow developers. This is when FormBox was born.

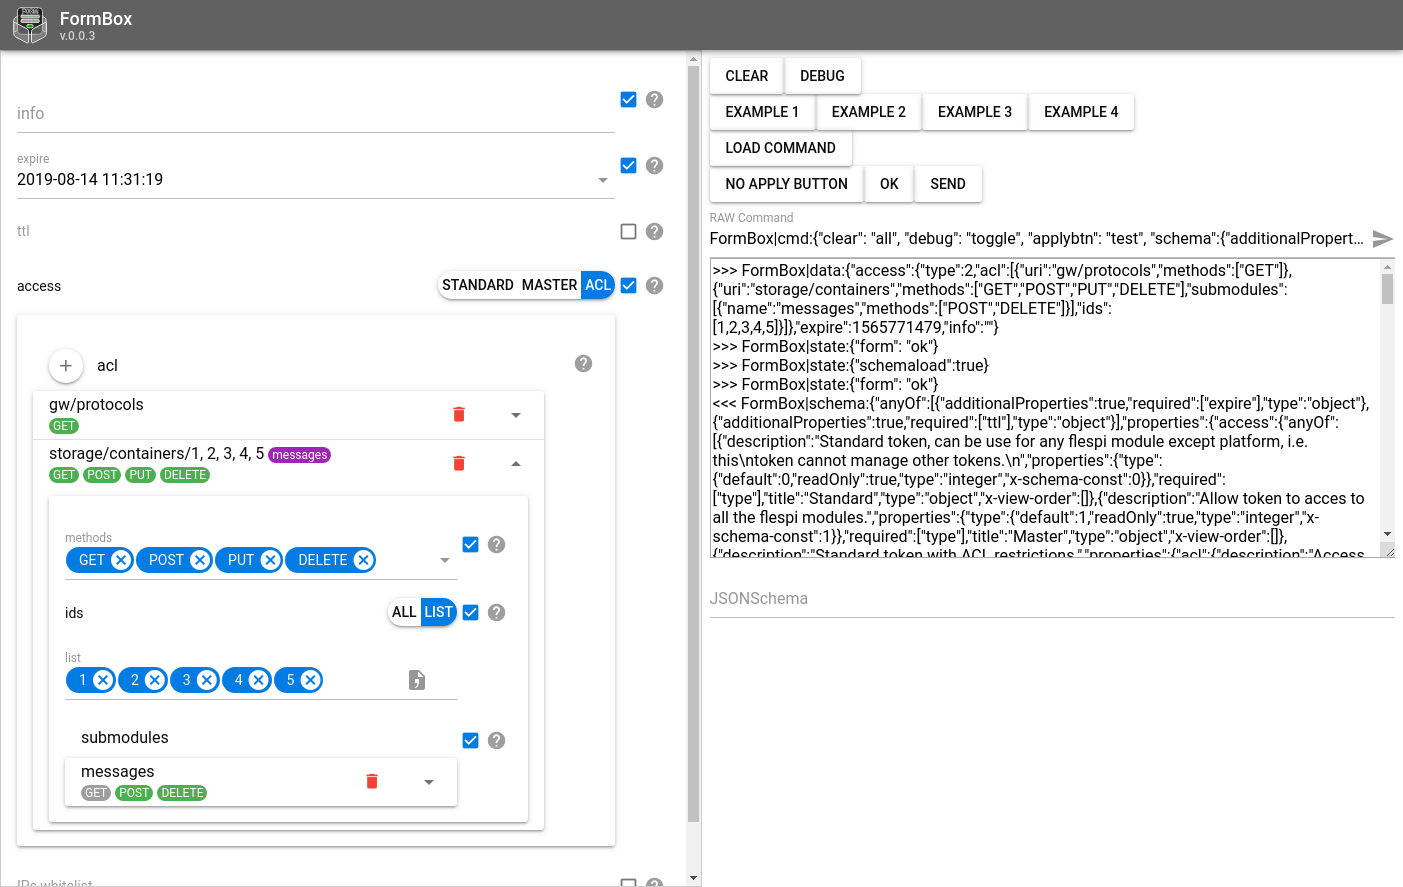
How to use FormBox
The idea of FormBox available at https://formbox.flespi.io/ (there is nothing at the link since this is not a standalone app) is rather simple.
FormBox can be used in two different ways:
1) as an iframe embedded on the web page
2) or in a separate browser tab/window.
If the latter option is chosen, the two windows will communicate using commands sent by JS via postMessage.
The web page calling FormBox should be subscribed to messages like this:
    window.addEventListener('message', function (event) {
      if (typeof event.data === 'string' && event.data.indexOf('FormBox|') === 0) {
        console.log(event.data)
        ...
      }
    })
Before sending commands you should wait for FormBox to report that it's ready to work:
FormBox|state:{"ready": true}Once this message is received, you can start managing the form.
Use the following syntax to send commands to FormBox opened in an iframe:
document.getElementById('form').contentWindow.postMessage('FormBox|cmd:...', '*')FormBox commands
To specify the schema for the form (build a form) you need the command of the following type:
FormBox|cmd:{"schema":{"additionalProperties":true,"description":"Send command with any parameters using connection to channel","title":"Send custom command","type":"object"}}This command will create a form filling the object with any random fields.
You can also specify the prepopulated data using the following command:
FormBox|cmd:{"data":{"testbool":true,"testint":123, "teststring": "some text"}}The result of this command will be three fields filled with specific values.
By default, as the form is filled out, all changes are instantly sent to the parent page that opened FormBox. If you want the form to send updates only on button click, activate it using the following command:
FormBox|cmd:{"applybtn":"send"}This will show the "send" button under the form (you can change button caption to any other text).
To disable the button use empty string:
FormBox|cmd:{"applybtn":""}You can enable debug mode to see what data is about to be sent:
FormBox|cmd:{"debug":true}And of course you can clear all the data:
FormBox|cmd:{"clear": "all"}All of the above can be done in a single command simply combining all objects in one config:
FormBox|cmd:{"clear": "all", "debug":true, "applybtn": "send", "schema":{"additionalProperties":true,"description":"Send command with any parameters using connection to channel","title":"Send custom command","type":"object"}, "data":{"testbool":true,"testint":123, "teststring": "some text"}}FormBox also has a handy sandbox where you can play around with the commands and see how they work: https://formbox.flespi.io/#/example
***
We use FormBox in all our projects, so we are directly interested in making it work great. We love doing small things and sharing them with the developers' community. Use FormBox to facilitate forms generation and save time for more exciting tasks.
You are welcome to discuss this article on the forum. Share your feedback, leave feature requests, and report issues.