Flespi offers a number of ways to deliver the data into your target platform or application. One of the options is via flespi streams — a push-based message delivery method. The most widely used is the HTTP stream that generates an HTTP request to an arbitrary URL with custom headers and JSON payload. Such a stream is a fast and straightforward way to deliver telematics data from your tracking devices into any third-party platform using a small script to properly handle the data flow.
Stream operates in a single thread mode and performs HTTP POST requests to your server/lambda delivering all accumulated messages as JSON array in BODY payload. Each new portion of messages will be posted only after flespi received a reply from your server to the previous request. You may configure the stream for recommended maximum size of each batch by using limit_messages option to lower the load on your HTTP server and improve throughput.
To secure communication between your server and flespi you may use SSL. To secure even more - provide stream with private CA to validate HTTPS connection to your server. Also you are can configure the stream to use custom Authorization headers and control their validity on your side.
You may configure message JSON representation and change parameters notation or leave only specified parameters in each message by using convert_message option.
You may skip unwanted messages by using validate_message option with some expression.
For a quick start check specific code samples in different programming languages to handle the HTTP requests from the flespi stream.
1. Create and configure an HTTP stream
The stream will take the data from a channel or device and forward it to your platform.
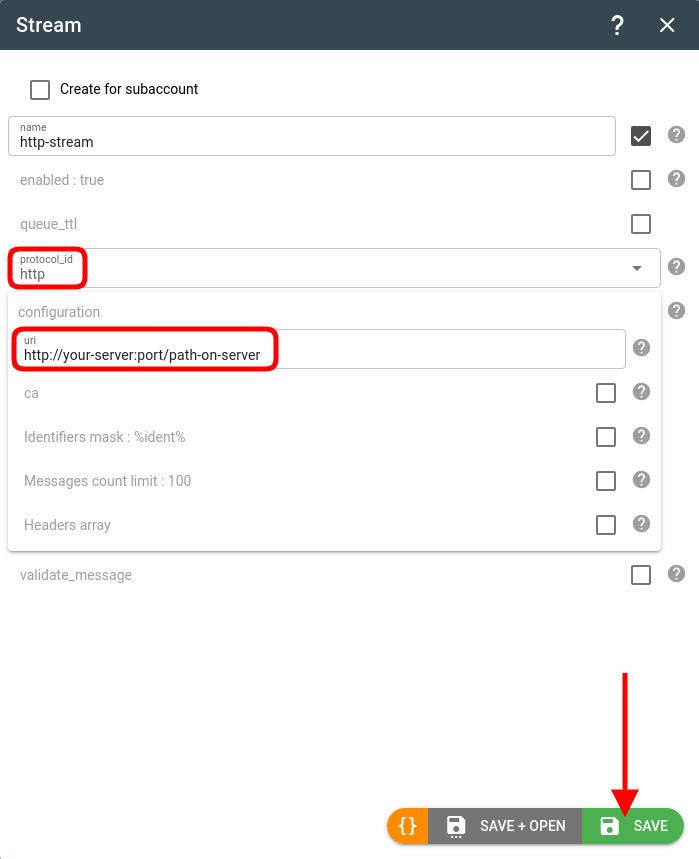
Let’s create an HTTP stream in the flespi platform: pick the http type in the protocol_id drop-down and populate the URI parameter with the path on your server, e.g. http://your-server:port/path-on-server.
Note: %ident% is the ident mask meaning that the messages from flespi will be sent via the stream with their original ident (IMEI). Usually, there's no need to change this parameter unless you want to distinguish the subset of devices coming from flespi. Then you can add a prefix like this "flespi-%ident%.
2. Subscribe the stream to the proper source
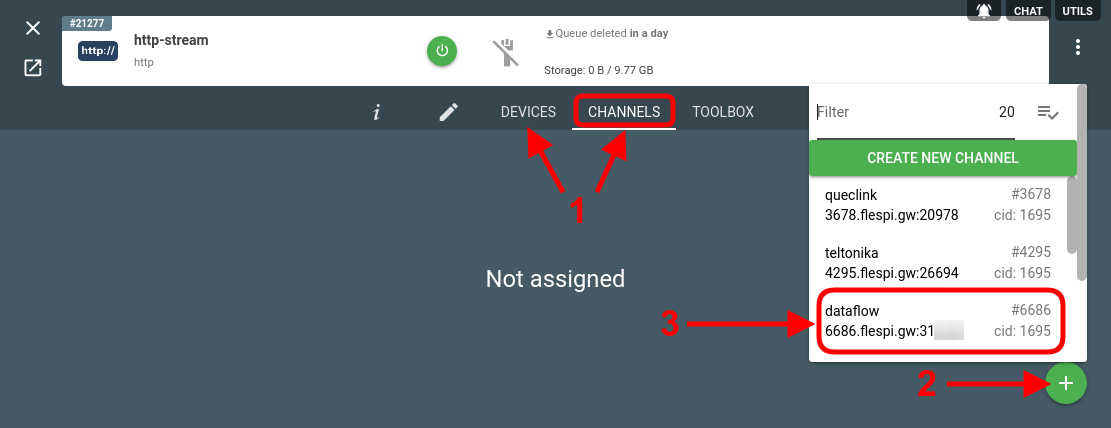
Now that we have a stream, we need to feed some data into it. Click on the stream card. Switch to the Devices to Channels tab (depending on what instance should serve a the source of data). Click the '+' button in the bottom right corner and pick the required source instance from the list.
Note: pick EITHER channel(s) OR device(s) — don’t mix up both — this may lead to duplicate messages.
3. Deploy script on your server
Pick one of the examples in the preferred programming language (we have PHP, NodeJS, and Python so far) and deploy it on your server or VPS at the location you specified in step 1 in the URI field.
4. Configure the script
Make the necessary changes to the script to instruct it to listen on your-server:port network endpoint and to handle a /path-on-server URI.
5. Get the data
Once steps 1 to 4 are complete, you will start getting batches of messages from the flespi platform on your side. The messages will be in JSON format like this:
[
{
    "ident": "352625333222111",
    "position.altitude": 273.61,
    "position.hdop": 0.7,
    "position.latitude": 49.069782,
    "position.longitude": 28.632826,
    "position.satellites": 18,
    "server.timestamp": 1650636570.426424,
    "timestamp": 1650636570.426424,
    "device.type.id": 123,
    "channel.id": 1111,
    "protocol.id": 10,
    "engine.ignition.status": true,
    ...
},
...
]
Now you are free to use the obtained telemetry data in your applications, projects, and platforms.
Important! The stream expects a 200 response code from the server to continue sending messages.
Change log
To stay in sync with all improvements and changes to the HTTP stream, subscribe to the change log on the forum.

