The S3 Media Upload stream automatically detects and uploads media files (photos, videos, tachograph files) from flespi device messages to S3 bucket with configurable path structure, providing reliable cloud storage for telematics media data.
The stream currently supports upload to AWS S3 storage and Oracle Cloud Object Storage and can be enhanced with other S3 storage providers in the future.
For each device message that contains media files (media.image.X, media.video.X, media.tacho.X) stream uploads them all into S3 bucket applying configurable object prefix. All such upload attempts are reported in stream log inside data parameter.
For each file upload attempt with stream log record data parameter you may find next fields:
- result: upload status - true/false;
- message_parameter: device message parameter name from which this media information was extracted;
- media: original device media information;
- s3: upload information provided by S3 with bucket, key, region and url properties;
By subscribing to stream logs with webhook you can process successful file uploads and perform any extra actions such as automatic media file removal from flespi and/or enhancing device message with a link to s3 storage.
How to use
Go to Telematics hub -> Streams -> green “+” button.
Give your stream a name.
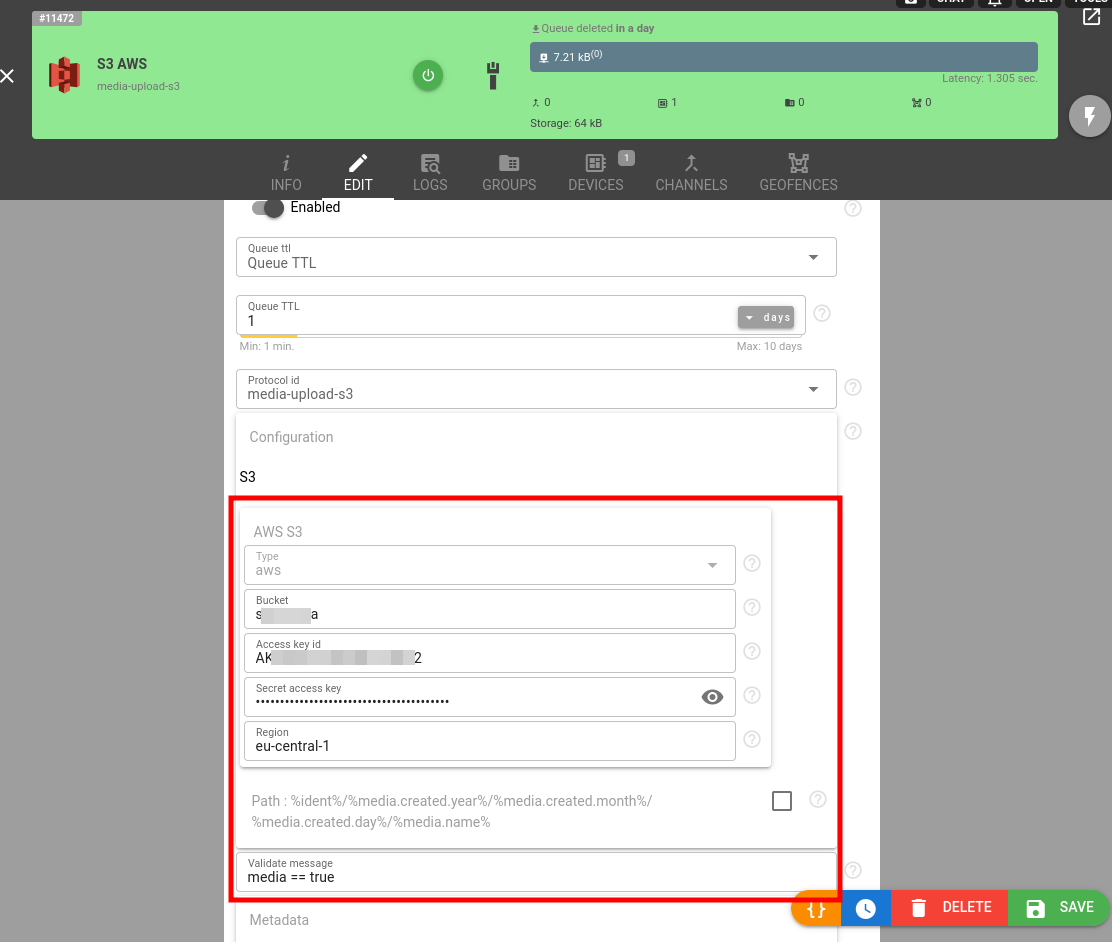
Pick the “media-upload-s3” protocol ID.
Set "media==true" in stream's validate_message field to handle only messages with media files attached.
Enter AWS S3 configuration properties such as region, bucket, access key id and secret key. Please follow AWS configuration guide to obtain them.
For the Oracle Cloud Object Storage together with region, bucket, access key id and secret key you also need to provide Object storage namespace which can be found in Account Management -> Tenancy Details section.
Path Templating (Optional): The path field supports dynamic placeholders with all device message keys, all media keys and date components (in UTC) of media creation time. Default is "%ident%/%media.created.year%/%media.created.month%/%media.created.day%/%media.name%". Examples:
"fleet/%ident%/media/%media.name%"→"fleet/123456789012345/media/actualfilename.jpg""cameras/%device.name%/%media.created.year%-%media.created.month%/%media.created%.avi"→"cameras/Fleet_Truck_01/2024-08/1234567890.avi"
Click Save and the new stream will appear in the streams list.
Now subscribe stream to device suitable to report media files: video or tacho enabled. If device already has media files reported in messages you can navigate to device LOG & MESSAGES, enter "media == true" in messages filter, open context menu over a message with right click and select "Re-register message" to re-publish it again into the device. Stream will see the re-published message and perform its processing.
Analyze stream logs to troubleshoot success or failure in media file upload.
To simplify media upload testing we suggest to use Telegram channel and device as the simplest device in flespi suitable to report media files.
Accessing Uploaded Files
Stream logs contain the complete S3 URL in data[].s3.url field. Files are private by default. For public access, follow the AWS configuration guide instructions on making uploaded files publicly readable.
S3 Configuration
Your objective is to configure AWS/Oracle S3 storage and retrieve S3 Bucket Name, Bucket Region, Access Key ID and Secret Access Key values with which you may create flespi stream.
The best way to configure the S3 upload is to start a session with modern LLM of your choice (Gemini, ChatGPT, Claude, etc) and go through it. Feed it with this task description (insert the required cloud service provider name in the beginning):
Objective: Generate a comprehensive, step-by-step guide for a user with a root AWS / Oracle account to configure the necessary resources for secure, programmatic file uploads to an S3 bucket.
Core Requirements: Your guide must instruct the user on how to perform the following actions from scratch:
Create a dedicated S3 Bucket: Detail the process of creating a new S3 bucket in a specific region.
Create a new IAM User: Explain how to create a new IAM user with programmatic access to generate an Access Key ID and a Secret Access Key.
Define and Attach a Least-Privilege IAM Policy: Provide instructions to create and attach a custom IAM policy for the new user. This policy must grant only the s3:PutObject permission (for uploading files) and s3:ListBucket permission (for bucket availability testing) and be scoped specifically to the S3 bucket created in step 1.
Summarize Critical Information: Conclude the core setup by creating a clear summary section that lists the essential pieces of information the user will need for any application or script: S3 Bucket Name, Bucket Region, Access Key ID, Secret Access Key.
Secondary Objective (Optional Step):
After detailing the core setup, add a distinct section explaining how to make the uploaded files publicly readable. This section should cover:
Editing the S3 bucket's "Block Public Access" settings.
Applying a bucket policy that grants
s3:GetObjectpermissions to the public (Principal: "*").
And use LLM directly for any subsequent questions. Or you are welcome to use directly the step-by-step AWS S3 upload configuration guide below.
AWS S3 Upload Configuration Guide
This guide will walk you through setting up secure, programmatic file uploads to an S3 bucket using the AWS Management Console with least-privilege security principles.
Prerequisites
- Root AWS account access
- Access to AWS Management Console
Step 1: Create a Dedicated S3 Bucket
1.1 Navigate to S3 Service
- Sign in to the AWS Management Console
- In the search bar at the top, type "S3" and select Amazon S3
- Click Create bucket
1.2 Configure Basic Settings
- Bucket name: Enter a globally unique bucket name (e.g.,
my-app-uploads-2024)- Must be 3-63 characters long
- Can contain lowercase letters, numbers, and hyphens
- Must start and end with a letter or number
- AWS Region: Select your preferred region (e.g.,
US East (N. Virginia) us-east-1)- Note this region for later use
1.3 Configure Bucket Settings
- Object Ownership: Leave as "ACLs disabled (recommended)"
- Block Public Access settings: Keep all four options checked (recommended for security)
- Bucket Versioning: Choose "Disable" (unless you specifically need versioning)
- Default encryption:
- Select "Server-side encryption with Amazon S3 managed keys (SSE-S3)"
- Leave other encryption settings as default
1.4 Create the Bucket
- Review your settings
- Click Create bucket
- Important: Note down the exact bucket name and region for later use
Step 2: Create a New IAM User
2.1 Navigate to IAM Service
- In the AWS Console search bar, type "IAM" and select IAM
- In the left sidebar, click Users
- Click Create user
2.2 Configure User Details
- User name: Enter a descriptive name (e.g.,
s3-upload-user) - Provide user access to the AWS Management Console: Leave unchecked (we only want programmatic access)
- Click Next
2.3 Set Permissions (Temporary)
- Select Attach policies directly
- For now, don't attach any policies (we'll create a custom policy later)
- Click Next
2.4 Review and Create User
- Review the user details
- Click Create user
- You'll see a success message with the username
Step 3: Generate Access Keys for Programmatic Access
3.1 Access the New User
- From the Users list, click on the username you just created
- Click on the Security credentials tab
- Scroll down to Access keys section
- Click Create access key
3.2 Configure Access Key
- Use case: Select Application running outside AWS
- Check the confirmation checkbox
- Click Next
3.3 Set Description (Optional)
- Description tag: Enter something descriptive like "S3 upload application"
- Click Create access key
3.4 Retrieve Credentials
- Critical: Copy and securely store both:
- Access Key ID (starts with "AKIA...")
- Secret Access Key (long alphanumeric string)
- Click Download .csv file for backup
- Click Done
⚠️ Security Warning: This is the only time you'll see the Secret Access Key. Store it securely and never share it publicly.
Step 4: Create a Least-Privilege IAM Policy
4.1 Navigate to Policies
- In the IAM dashboard, click Policies in the left sidebar
- Click Create policy
4.2 Define Policy Permissions
- Click the JSON tab
- Replace the default content with the following policy (replace
YOUR-BUCKET-NAMEwith your actual bucket name):
{
    "Version": "2012-10-17",
    "Statement": [
        {
            "Effect": "Allow",
            "Action": [
                "s3:PutObject",
                "s3:ListBucket"
            ],
            "Resource": [
                "arn:aws:s3:::YOUR-BUCKET-NAME/*",
                "arn:aws:s3:::YOUR-BUCKET-NAME"
            ]
        }
    ]
}
4.3 Review and Create Policy
- Click Next
- Policy name: Enter a descriptive name (e.g.,
S3-With-HeadBucket-Policy) - Description: Enter something like "Allows PutObject permission for specific S3 bucket"
- Click Create policy
Step 5: Attach Policy to User
5.1 Navigate Back to User
- Go back to IAM → Users
- Click on your created user (e.g.,
s3-upload-user) - Click on the Permissions tab
- Click Add permissions
5.2 Attach the Custom Policy
- Select Attach policies directly
- In the search box, type the name of your custom policy (e.g.,
S3-With-HeadBucket-Policy) - Check the box next to your policy
- Click Next
- Click Add permissions
After completing this setup, you now have the following essential information needed for your application or scripts:
📋 Configuration Details
| Parameter | Value | Example |
|---|---|---|
| S3 Bucket Name | [Your bucket name] | my-app-uploads-2024 |
| Bucket Region | [Your selected region] | us-east-1 |
| AWS Access Key ID | [Starts with AKIA...] | AKIAIOSFODNN7EXAMPLE |
| AWS Secret Access Key | [Long alphanumeric string] | wJalrXUtnFEMI/K7MDENG/bPxRfiCYEXAMPLEKEY |
Troubleshooting
Stream logs contain comprehensive information about stream operation and information to which S3 object ID media file was stored. In case of any problems please check the "reason" reported by stream in logs, it may guide you what part of stream configuration is incorrect.
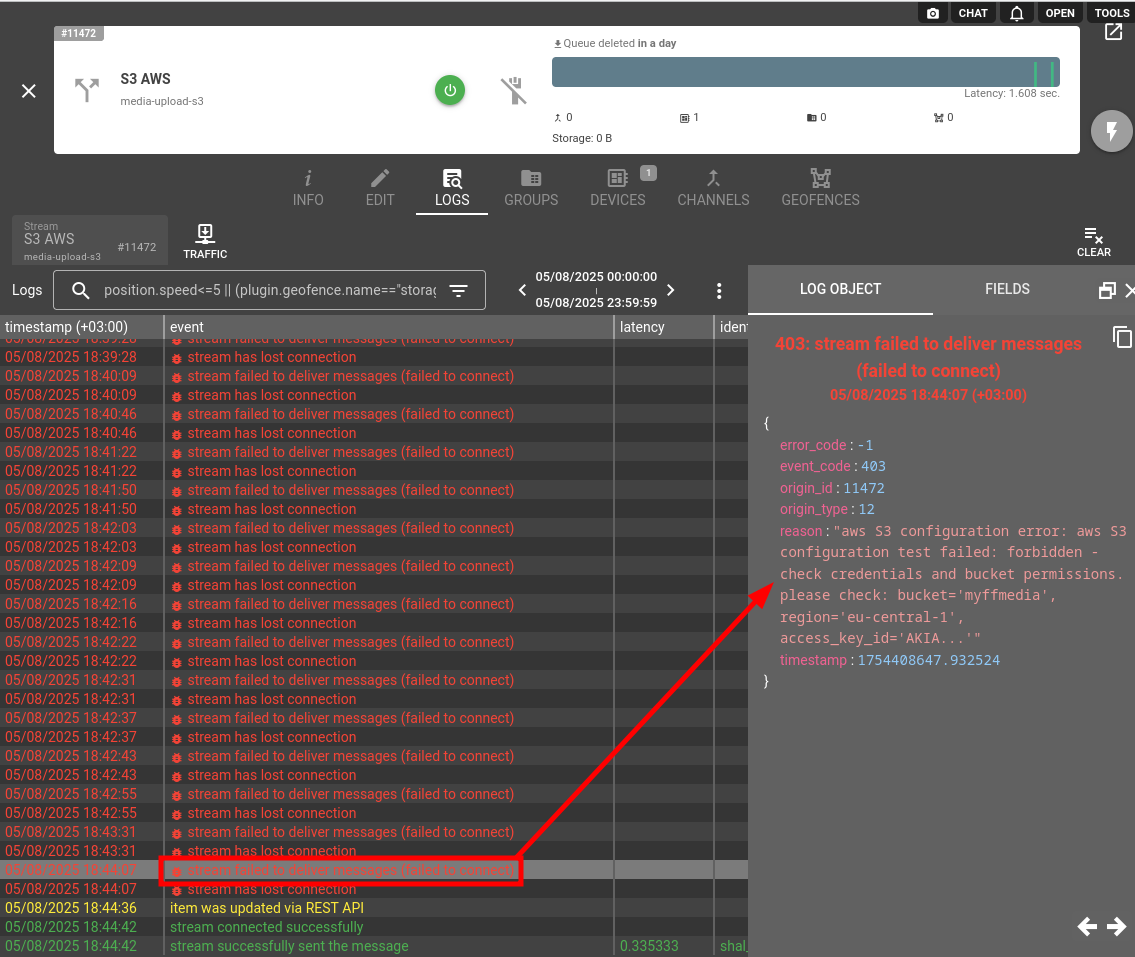
Stream failure reasons can be due to:
- Incorrect AWS S3 configuration - most probably the problem is in security policies for the bucket;
- Device message does not contain expected parameters with media data;
Change log
To stay in sync with all improvements and changes to the upload device media to S3 stream, subscribe to the change log on the forum.