- Essentials
- How tacho works
- How to setup
- Downloading files from tachograph
- Automatic tachograph files download
- Parsing tachograph data files
- Supported devices
- Troubleshooting
Essentials
Tacho functionality in flespi is designed to provide you with a simple and durable mechanism to remotely extract the data from the tachograph via a connected tracker. Extracted data from the tachograph is stored into the device for up to 10 years and is available via API for any further processing.
Tachograph authentication is provided via open source Tacho Bridge Application which is installed on the user’s computer to provide flespi with remote access to company cards. You may use this application as is or fork it and adapt to your company branding.
How tacho works
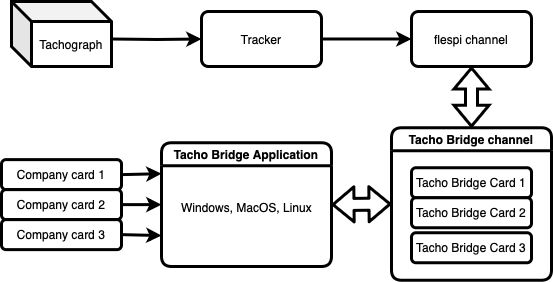
Tacho functionality is provided via the tacho-bridge channel, open source application Tacho Bridge Application, and its corresponding Tacho Bridge App and Tacho Bridge Card virtual devices.
Tacho-bridge channel provides an entry point for the locally installable Tacho Bridge Application to connect to your flespi account.
Tacho Bridge Application is installed on the user's computer or tacho card hotel server. Application is configured with its own unique ident and the address of the tacho-bridge channel it will establish the connection to. Ident is used to uniquely identify a corresponding Tacho Bridge App virtual device through which you will be able to track the current Application status and perform remote diagnostics or configuration.
For each company card, you create a corresponding Tacho Bridge Card device in your flespi account and configure the Application with the card information to link ICCID (Integrated Circuit Card Identification) with the company card number printed on the card. ICCID is used to identify the card in the reader while the company card number is used as a card identifier everywhere further in flespi. In the virtual flespi device linked to this card, you are able to track the online/offline status of the card in the reader’s slot and various logs and messages for transparent issues diagnostics.
When a tachograph needs to authenticate with a company card, flespi automatically provides it via the Tacho Bridge Application connected to the Tacho Bridge channel in the user's account. Each company card must be registered as a dedicated Tacho Bridge Card device in the user's account.
The tacho-bridge channel and its App and Card devices respect your subaccount hierarchy and may be placed in the same account where devices representing trackers are registered. It can also be located higher in the hierarchy if you want to hide all or part of the tacho-related infrastructure from the device owner.
By creating multiple tacho-bridge channels in separate subaccounts you are able to create fully isolated tachograph authentication systems that are independent from each other.
How to setup
To activate tacho functionality in flespi you need:
Company card for tachograph authentication issued by the official authority (Ministry of Transport).
Smart card reader connected to the PC or tacho card hotel server.
Tacho Bridge Application installed on your PC or server.
tacho-bridge channel in your flespi account.
Virtual Tacho Bridge App devices per each Application created in your flespi account.
Virtual Tacho Bridge Card devices per each Company card created in your flespi account.
Device that supports tacho functionality, registered in your flespi account and connected to the Tachograph in the vehicle.
Tachograph in the vehicle with driver cards inserted.
1. Create a channel configured with the tacho-bridge protocol. Copy its URI address where you will configure your Tacho Bridge Application to connect to.
2. Install the Tacho Bridge Application on your PC. Configure it with a unique App ident (you may use any value) and the address of your tacho-bridge channel. The App Ident is a unique identifier automatically generated during the first launch of the application and stored in the local configuration. It is reused on every subsequent launch. By default, the identifier follows the format: TBA followed by 13 digits (e.g., TBA1234567890123). You may manually change this identifier in the configuration file, but only the numeric part should be modified. The TBA prefix must remain unchanged.
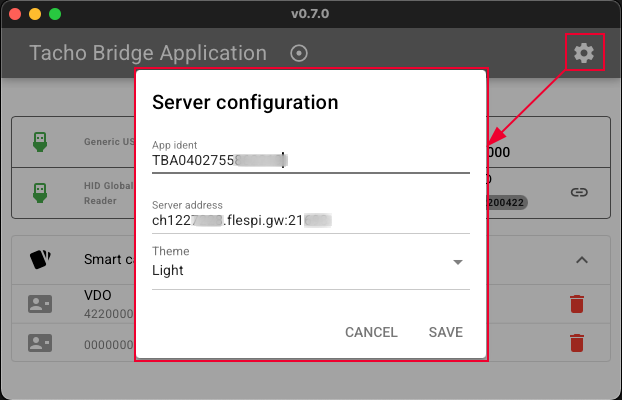
In the logs of your tacho-bridge channel, you should see attempts from the Application to connect and identify itself to the channel. If you do not see any connection attempts there please ensure that you configured the Application with the right server address and your PC has an Internet connection.
3. Create a Tacho Bridge App device in your flespi account with the same ident as you configured in the Application (see it in channel logs). You may do this directly from the channel by navigating to its IDENTS tab and clicking on the Create button to the right of the corresponding app ident. It’s important to specify the ‘Tacho Card App’ as the device type during device creation.
The Application will reconnect to the channel and the newly created device’s card should be in green color to indicate that it is now connected.
4. In the installed Application you see all inserted cards in the reader with their ICCID number.
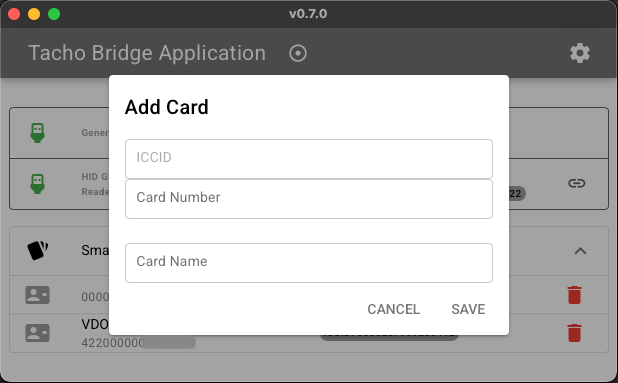
Now you need to configure their respectful company card numbers per each unique card ICCID. You can pre-configure cards even if they are not physically connected. To do this, click the green ADD CARD button. In the popup window, enter the Company Card Number and optionally a Name to make it easier to identify in the list. If the card is already physically connected, you can create a permanent configuration by clicking the link icon (🔗) next to the UNKNOWN CARD in the top section. In the blue window, either click the ADD CARD button to create a new card, or select an existing one from the list to complete the link. There is no limit to the number of cards you can create. Once linked, the card will automatically connect to the server specified in the application settings.
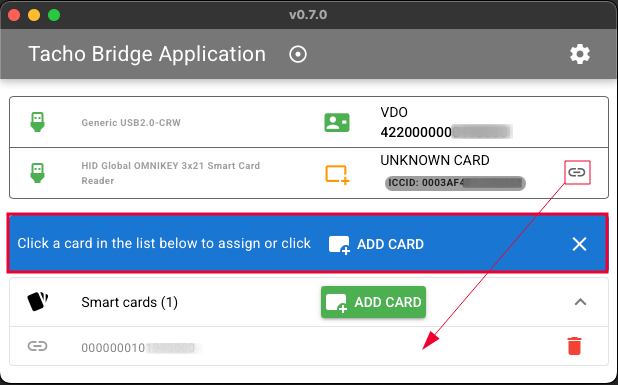
Once the card has been linked it will be replaced with the company card number used. Immediately the card will connect to the tacho-bridge channel with the company card number as ident and its icon will turn green.
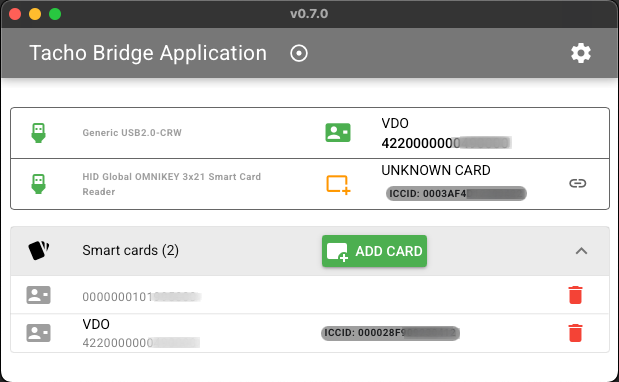
5. Create a Tacho Bridge Card device in your flespi account with the company card number as ident. You may do this directly from the channel by navigating to its IDENTS tab and clicking on the Create button to the right of the corresponding card ident. It’s important to specify ‘Tacho Bridge Card’ as device type during device creation.
When the card is inserted in the reader and the Application is running you may track its availability to flespi (and to Tachograph for authentication) by the green color of the corresponding device.
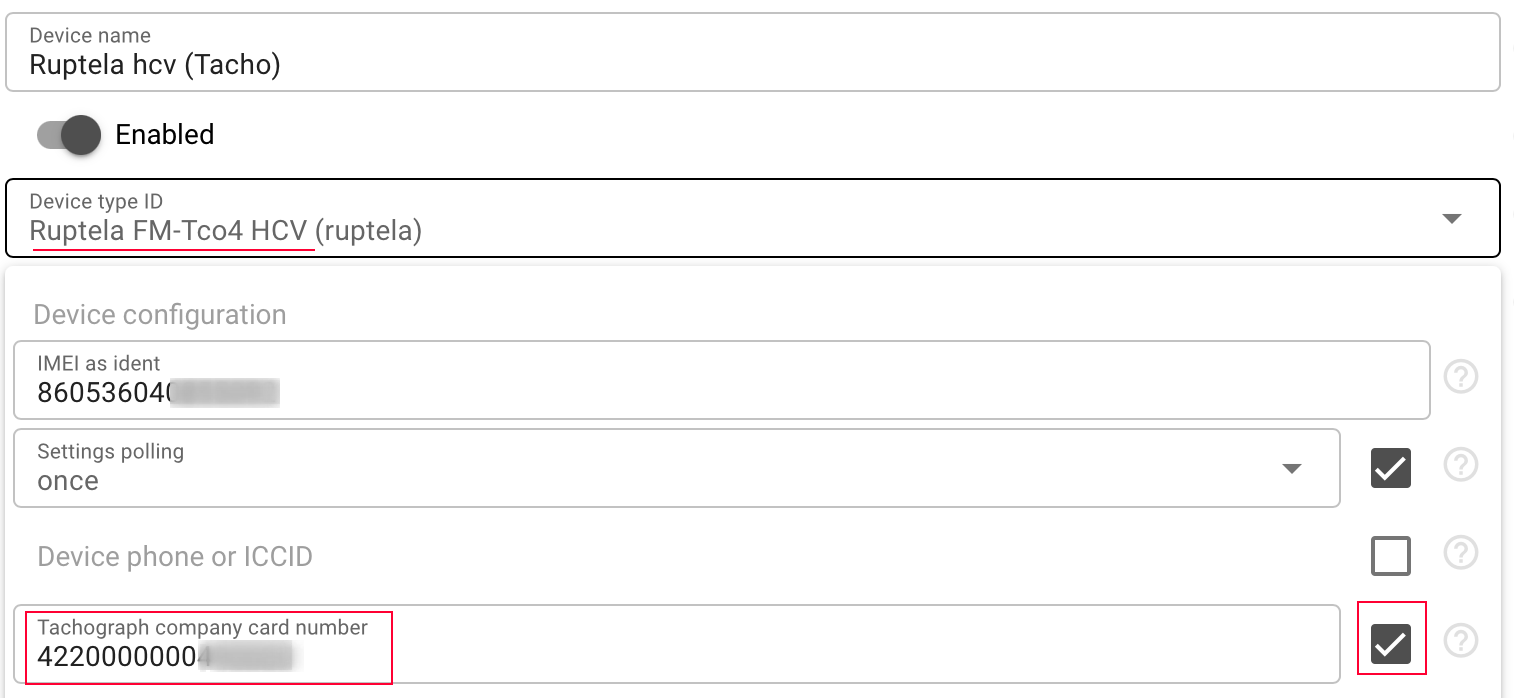
6. Open the properties of the tacho-enabled device in flespi and store the company card number in its configuration.
Now, if everything is configured correctly and has online status in flespi you may try to extract data from your Tachograph by activating the corresponding command.
Downloading files from tachograph
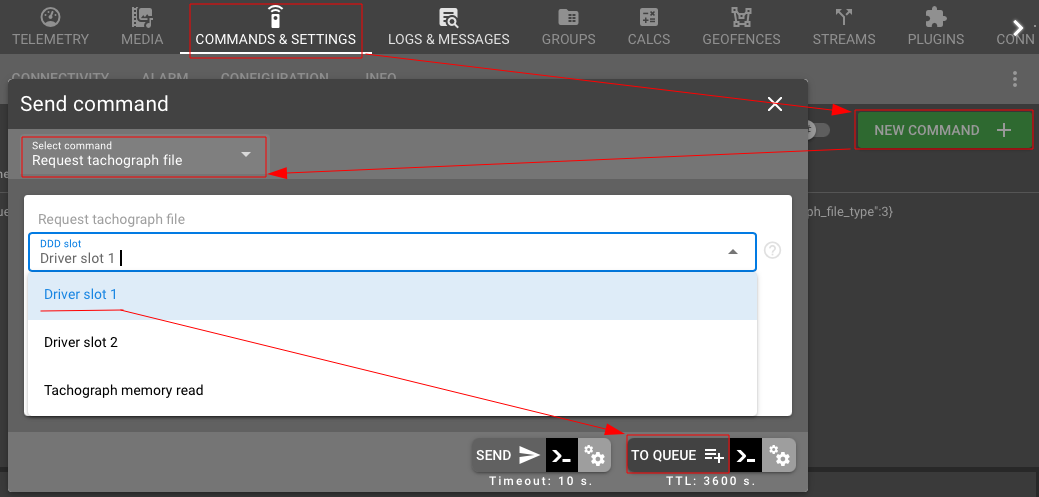
To download a file from the tachograph, you need to send the ‘Request tachograph file’ command to the device associated with the tracker. Please send command only using commands queue and with at least 20 minutes TTL (1 hour recommended) because tachograph commands usually are executing around 5-15 minutes.
You can do this directly from the Commands & Settings tab in the device by clicking on the “New command” and selecting “Request tachograph file”. Select the DDD slot and click the “To queue” button to schedule command execution. Or copy its API call structure via the “>_” button and call it from your integration directly.
When the command is executed by the tracker device it will automatically authenticate the tachograph via the Tacho Bridge Card device with the same ident as the company card number configured in the tracker device. Thus it is essential that the Tacho Bridge Application that provides access to the physical card is active and the corresponding Tacho Bridge Card device is online in flespi during this phase.
Any progress or failure during command execution you may track in device logs where each step is verbosely reported.
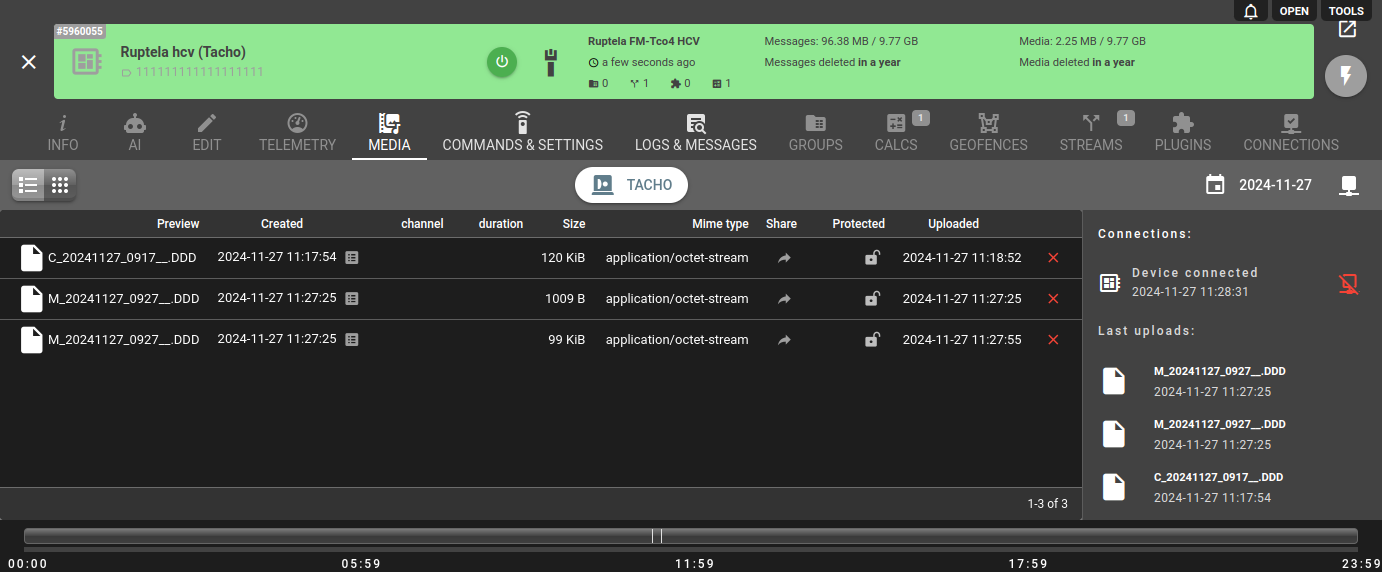
Once the download is completed the file from the tachograph will be placed into device media storage and provided to you via a link. The same link to the file will be stored in the command result as well. You may use that link to download this file into third-party storage if needed.
You can access all media files related to the device via the ‘MEDIA’ tab on the device page.
You can fully utilize REST API to access or delete downloaded files or set up automatic files deletion and rotation. Files from tachograph are identified via type="tacho" attribute inside the file "meta" information.
To handle tachograph related device events via MQTT you have several options:
Subscribe to ‘request_tachograph_file’ command execution result to which the file link will be added upon successful command execution - via 'flespi/log/gw/devices/{id}/commands-queue/request_tachograph_file/processed' topic.
Subscribe to a new device message registered event and process messages with ‘media.tacho’ parameter that contains a link, name, size, and time of the file from tachograph - via '$filter/payload=exists%28%27media.tacho%27%29/flespi/message/gw/devices/{id}' topic.
Handle a media file uploaded event with detailed media information - via 'flespi/log/gw/devices/{id}/media_file_uploaded' topic.
You may also subscribe to 'flespi/log/gw/devices/{id}/tacho/communication' topic to receive all events about communication between flespi and tachograph.
You can add custom attributes to the stored file by using the PUT /gw/devices/XXX/media API method.
External Storage Integration: For automatic backup or long-term archival of tachograph files, you can use the S3 Media Upload stream to upload them directly to AWS S3 with configurable path organization.
Automatic tachograph files download
After tachograph file download process is tested and confirmed you can enable automatic tachograph files retrieval by flespi with a single "Automatic file request" checkbox in device configuration:
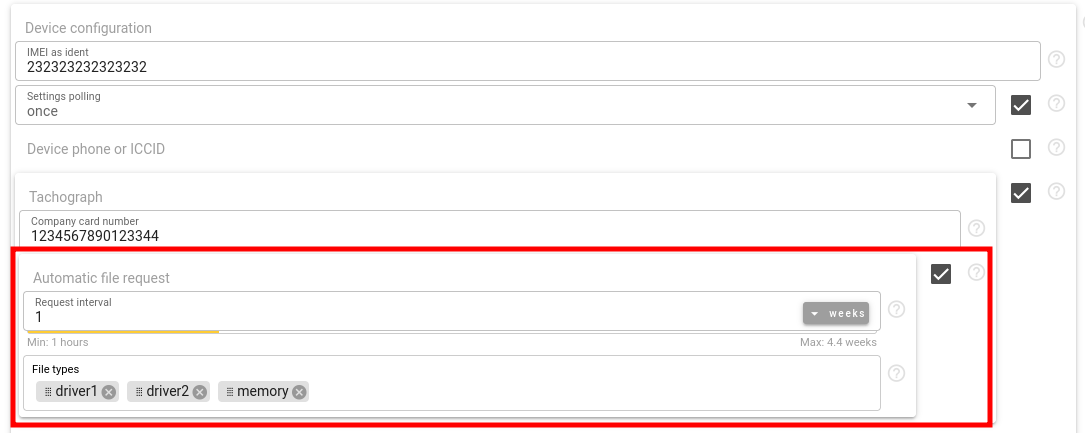 When checkbox is set flespi will automatically schedule 'request_tachograph_file' command for each specified slot when all conditions are met:
- Last automatic tachograph file download command for this slot was successfully performed at least "request interval" ago;
- Device is online and suitable for tachograph file retrieval operations (ignition is ON, etc);
- Corresponding Tacho Bridge Application infrastructure is online and available for authentication;
- At least 5 minutes passed since latest unsuccessful automatic file request
The request interval must be chosen wisely. The optimal solution is to download data once a week (default). The company card is a bottleneck and has a technical limitation (at the card level, not flespi) - only one device at a time can use the company card for authorization. When many devices (hundreds) compete for the use of 1-2 cards, this creates delays for other devices. Some may have poor connection quality or problems connecting with tachograph, which adds to the load on the queue. Therefore, default interval is the best option, which fully complies with all data download regulations with a 4-fold reinsurance in time.
The choice of file type should also be made wisely. The automatic download mechanism uses smart priority logic to avoid accumulating a common queue and getting stuck on downloading data that the tracker or tachograph cannot give for some reason. The smart mechanism uses the tracker's native capabilities provided by the protocol, as well as the number of repetitions and the conditions for "freezing" the tachograph data download. This allows for high-quality management of the tracker load and the queue among others. However, this mechanism is not a solution to all problems and it is not possible to foresee all possible problems. Therefore, if possible, it is necessary to select only the driver's slot used to avoid potential difficulties with downloading. Data from the tachograph memory is always downloaded.
Automatically scheduled command operations you can track in device logs. If Tacho Bridge Application infrastructure is correctly provisioned you can expect that automatic system will durable download tachograph files into a stable flespi media storage within configured interval.
Parsing tachograph data files
As part of the data retrieval workflow, tachograph files are now parsed during the download process, enabling immediate access to structured data. This approach allows to get the necessary data to form a correct file name. The system can work and analyze all types of files that can be downloaded remotely from a tachograph: driver file, memory file (VU file). For all generations of tachographs: G1, G2.1, G2.2. The manufacturer does not matter because the data inside the tachographs is regulated by a common standard.
Default name format.
The name formatting is dynamic depending on the file content. In accordance with the legislation of a particular country. The default file name format (for all countries except France and Spain) is the VDO format with the DDD extension. For example:
Memory file: M_20250801_1406_LT01STR_VINNUMBER00001001.DDD (M - memory file type, Date, time, vehicle registration number, VIN)
Driver file: C_20240808_1228_E_Smith1407_1200000000110200.DDD (C - driver file type, date, time, first letter of name, last name, driver card number)
Name format used for France.
Memory file: FXX-NNN-ZZ2508011746.V1B (F - letter designation of the region, state registration number of the car, date and time). File extension V1B.
Driver file: FXX-NNN-ZZ2508011746.C1B (F - letter designation of the region, state registration number of the car, date and time). File extension С1B.
Name format used for Spain.
Memory file: V_1234ABC_E_20250801_1745.TGD (V - memory file type, vehicle registration number, letter designation of the region of the country, date, time) File extension TGD.
Driver file: C_1200000000110200_E_20250801_1745.TGD (C - card file type, driver card number, letter designation of the country region, date, time) File extension TGD.
Supported devices
Tacho functionality is fully supported only for these devices:
A full list of devices with tacho functionality can also be found here. You can request integration of tacho functionality for other devices according to the integration instructions.
Troubleshooting
The process of downloading a file from a tachograph is quite a complex and multi-stage task with many remote parties involved (tachograph, tracker, flespi, application, company card). Our tacho functionality integration is specially designed to mitigate any possible issue and make this process as smooth and durable as possible.
During the execution of any command where a tachograph or company card is involved, we publish into the device logs all operations. By looking into device logs you should be able to quickly detect the party (tachograph, tracker, flespi, Tacho Card App, smart card reader, or company card) that is malfunctioning. All device logs related to the tacho functionality have “event_code”=340 (tacho communication) and their “tacho_code” property provides a more verbose description per each event.
File download command execution is impossible without a correct configuration of all the parties involved. For example, the device log will display “The Company card '422000000000000' is not online. The tachograph operation cannot be started. Request attempt 1/3" if the card is not connected to the flespi. Or “The company card configuration field is not specified in the device settings. The tachograph operation cannot be started." if the company card number is missing in the tracker configuration.
You can visually monitor if the tachograph is able to authenticate through the card by looking at the ‘connected’ status of the corresponding Tacho Bridge Card device. If the device is connected (green) then everything is correctly configured. If the device is not connected (white) check if the corresponding Tacho Bridge App is connected as well. If it is offline it means that the user did not start the local application or it is misconfigured with the wrong server address or ident. If the App is online while the Card is offline it means that either the card is not in the reader or its ident is incorrectly configured.
A common cause of a download error is correctly associated with incorrect tracker behavior or settings. The tachograph cannot correctly download a file if the ignition is off or there are failures in the physical connection of the tracker or tachograph. The tachograph may not always report that the ignition is off, so if the problem with downloading a file is repeated, you should pay attention to this. The ignition connection and the presence of a configured CAN bus that the tachograph uses in the vast majority of cases can be determined by the parameters that the tracker sends to the server or by the corresponding commands to obtain the connection status of the tachograph.
Here is the list of possible problems you may encounter and information on how they can be mitigated.
Problem: when the device downloads data from the black box, it may not respond to the tachograph file download command sent.
Solution: the command has a timeout of 5 minutes. If the tracker does not respond, flespi will make 2 more attempts and then the command will be rejected. To repeat the attempt, you need to put the command in the queue again.
Problem: the tracker's connection to the channel was broken during authentication.
Solution: flespi will try to restore authentication and continue the command execution. If the tracker stops responding for some reason or responds with an error, the current authentication will be rejected and the flespi will send the command again after some time.
Problem: the tracker's connection to the channel was broken while downloading a file.
Solution: at the moment, flespi does not have the ability to restore and continue an interrupted file download. After reconnecting the device to the channel, flespi will first try to cancel the current file download, in case of failure, it will skip the rest of the file that the device transmits and then resend the command to download the file.
