Flespi offers a number of ways to deliver the data into your target platform or application. One of the options is via flespi streams — a push-based message delivery method. The most widely used is the HTTP stream that generates an HTTP request to an arbitrary URL with custom headers and messages data payload in JSON.
In this article, we will provide specific code samples in different programming languages that, when hosted on your server, will handle the HTTP requests from the flespi stream.
1. Deploy script on your server
Pick one of the examples in the preferred programming language (we have PHP, NodeJS, and Python so far) and deploy it on your server or VPS at the location you specified on step 2 in the URI field.
Make the necessary changes to the script to instruct it to listen on your-server:port network endpoint. Then detect which HTTP URI will be used by the server you have just deployed. For PHP it most likely will be the path to the directory with index.php script in your web server root. For NodeJS and Python this URI is usually routed somewhere in the script. In our NodeJS example it will be "/post" and in Python is just "/".
On the next step, you'll need a URI to stream messages, you can get it like this: http://your-server:port/<uri>, where <uri> is the URI value you've detected according to the used example.
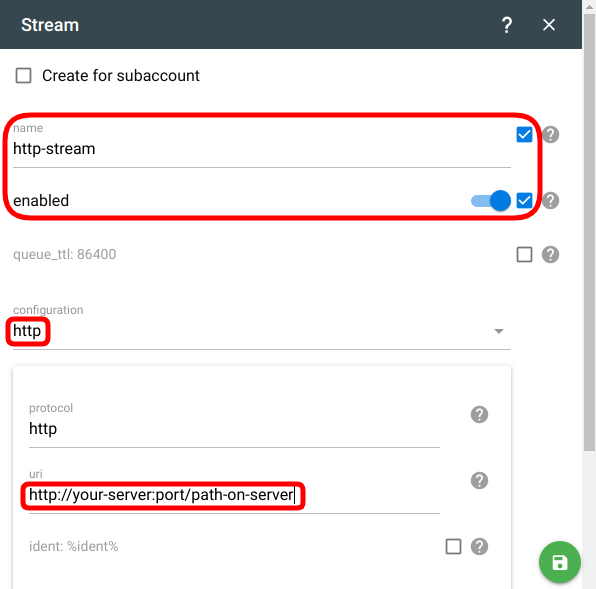
2. Create and configure an HTTP stream
Now let's create a stream. The stream will take the data from a channel or device and forward it to your platform.
Let’s create an HTTP stream in the flespi platform: pick http type in the configuration drop-down and populate the URI parameter with the path on your server, e.g. http://your-server:port/path-on-server.
3. Subscribe the stream
Now that we have a stream, we need to feed some data into it. To accomplish this, click on the stream card. Navigate to the Devices or Channels tab. Click the "plus" button in the bottom-right corner to add the item(s) you want to serve as the source for your stream.
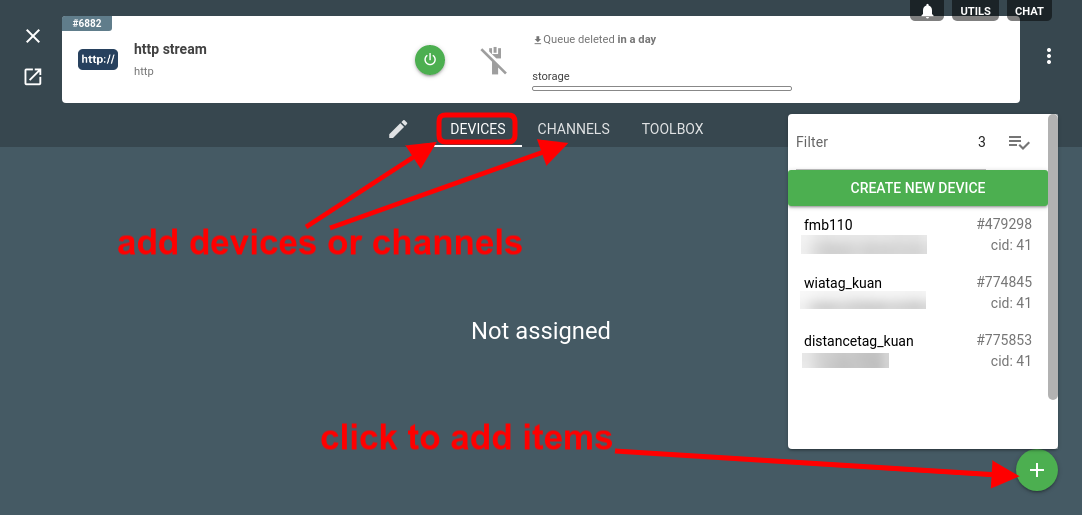
Note: pick EITHER channel(s) OR device(s) — don’t mix up both — this may lead to duplicate messages.
4. Troubleshoot if necessary
To make sure the stream started sending messages navigate to the Toolbox tab on the stream card. If you see the "stream has sent messages" log records, the stream operates correctly. If you get errors, check the stream configuration,
5. Get the data
Once the steps 1 to 4 are complete, you will start getting batches of messages from the flespi platform on your side. The messages will be in JSON format like this:
[
{
    "ident": "352625333222111",
    "position.altitude": 273.61,
    "position.hdop": 0.7,
    "position.latitude": 49.069782,
    "position.longitude": 28.632826,
    "position.satellites": 18,
    "server.timestamp": 1650636570.426424,
    "timestamp": 1650636570.426424,
    "device.type.id": 123,
    "channel.id": 1111,
    "protocol.id": 10,
    "engine.ignition.status": true,
    ...
},
...
]
Now you are free to use the obtained telemetry data in your applications, projects, and platforms.
***
Streams are a fast and straightforward way to deliver telematics data from your tracking devices into any third-party platform using a small script to properly handle the dataflow.
Try using streams and consult us in the online chat in case of any troubles.