
Couldn’t have put it better myself. This advice has always served me well.
We’ll look at two conceptually different approaches to managing complexity while working with the ESP8266 board.
Goal: publish the readings of the DS18B20 temperature sensor connected to ESP8266 to the flespi MQTT broker via secure MQTT over SSL connection.
The workflow in each of the two cases we explore is different, but the outcome is the same:
Way 1: Create a C-like code from scratch using Arduino IDE – in this case, we manage complexity on every level of development.
Way 2: Simple editing of a javascript project based on examples from Mongoose – operating system for IoT. We let the Mongoose OS do its job without digging into its internals.
Each way has its pros and cons, so let's explore them!
Arduino IDE
 Fork me on GitHub
The task of “ESP8266 board sends DS18B20 sensor readings to flespi MQTT broker” narrows down to three core questions:
- How to flash the ESP8266 board?
- How to read data from a DS18B20 sensor?
- How to securely send data to the MQTT broker?
Different developer groups have already solved these tasks. We just need to put these blocks together.
First, you should configure the Arduino IDE to work with ESP8266 by installing the additional Arduino Core for the ESP8266 board. It contains:
board profile: bootloader type, memory size and type, peripherals etc.
compilation instructions: SDK, packages, libraries etc.
IDE compatibility tools: flashing scripts, tests, examples etc.
Everything is open-source with more than 200 contributors. If something goes wrong, you can dig it right to the origin!
To build the sketch, you need to install two additional Arduino libraries:
- OneWire to connect a temperature sensor;
- Adafruit_MQTT_Library to establish MQTT over SSL connection.
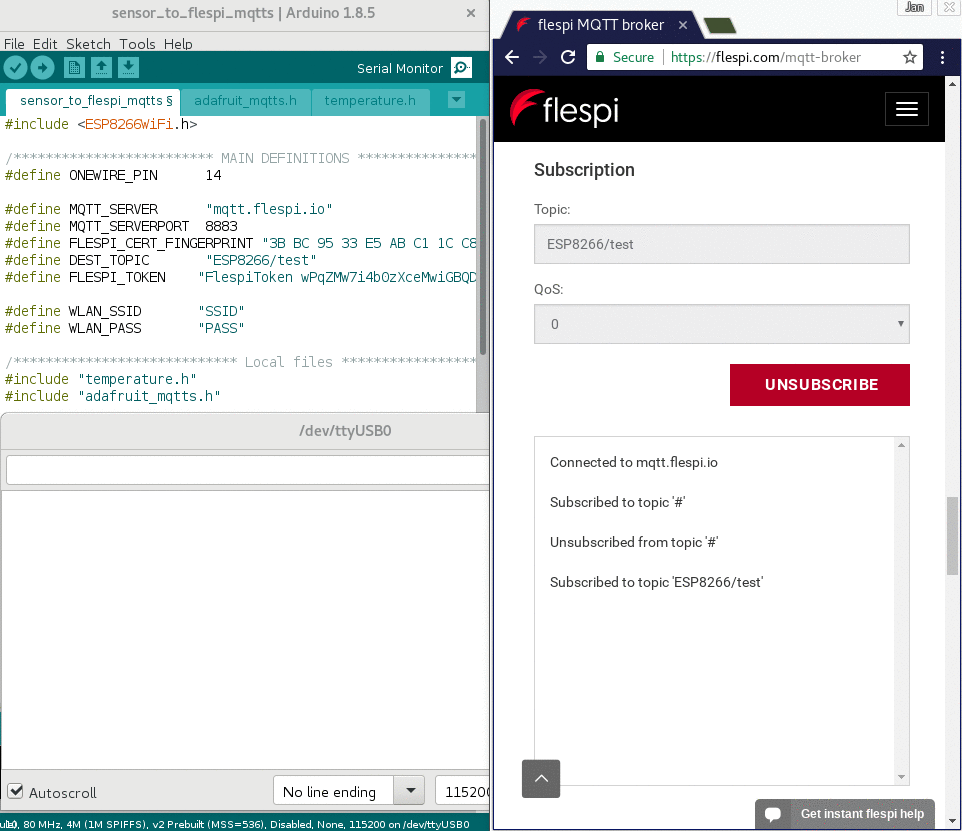
Here is the project for Arduino IDE. temperature.h includes the code to read data from the 1-wire sensor, and adafruit_mqtts.h includes the Adafruit functions for MQTT over SSL connectivity.
Note: to connect to MQTT broker via MQTT over SSL with Adafruit library you need to get a SHA1 fingerprint of flespi.io certificate and use it to establish a connection.
So in the main sensor_to_flespi_mqtts.ino we connect the ESP8266 board to a Wi-Fi network in the setup() function and implement the logic in main loop() function: check the connection to MQTT broker, get temperature value from the sensor, and publish it to the broker. Here is the test with live MQTT client on flespi.com:
That’s it. Let’s summarize what steps and skills such project requires:
- Install and set up IDE. Even with all the GUI tools, Arduino IDE has one need to understand how to include new hardware type, import libraries, use serial monitor, find the port to flash the board etc.
- Work with third-party libraries. Of course, Examples cover many cases, but if you need to step away, you have to know where to find and how to work with the code from third-party libraries. How to find suitable methods, how to use standard Arduino IDE libraries and many more.
- Write the code. Even for such an easy example, you have to understand each line of code to make it efficient. Moreover, implementing this code to another project may require additional development efforts.
Conclusion: this approach requires substantial knowledge of the behind-the-scenes stuff. But it gives you the maximum level of control and flexibility.
Mongoose OS
Now, let’s consider a higher-level tool to work with IoT boards – Mongoose OS. The developers call it an Operating System for IoT. Regarding managing complexity, it allows dealing with less code. You don’t care about:
how to connect the board to Wi-Fi
how to establish a secure MQTT connection
how to download libs, device profiles, and organize the project.
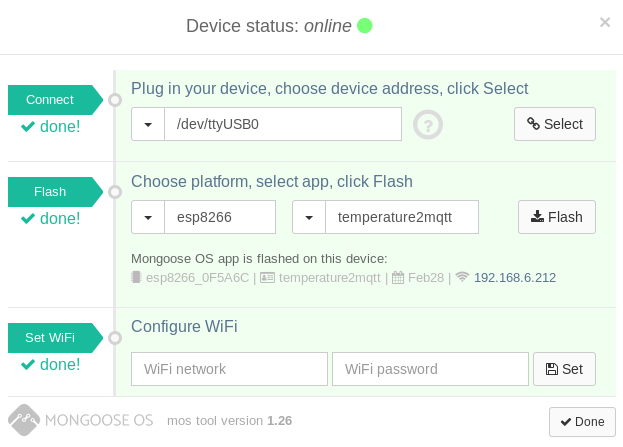
The process of flashing ESP8266 with Mongoose OS platform involves a few simple steps:
- Initial set up (as intuitive as possible):
- Download a CA certificate from flespi.io
 and upload it to ESP8266 board with Mongoose OS terminal tool
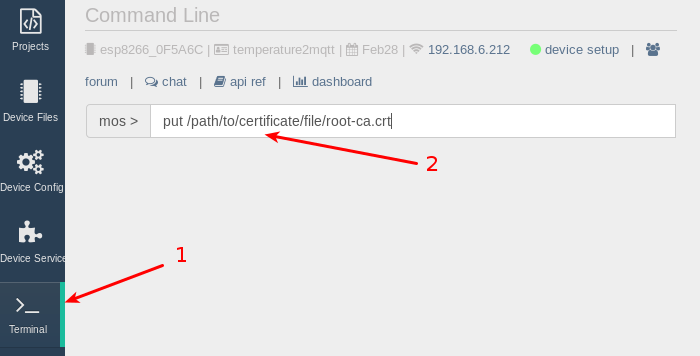
- Configure the device: go to Expert mode of Device configuration tab and edit the following fields:
The last field is a certificate downloaded from flespi.io and uploaded to board on the previous step"enable": true
"server": "mqtt.flespi.io:8883"
"client_id": "ESP8266"
"user": "FlespiToken REPLACE_WITH_YOUR_FLESPI_TOKEN"
"ssl_ca_cert": "root-ca.crt"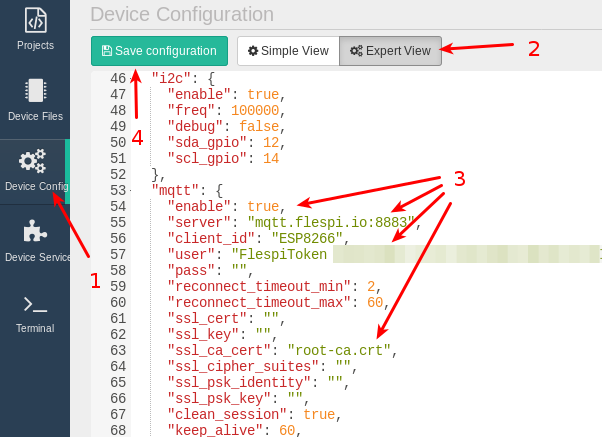
- Download the 1-wire sensor javascript example and add a single line of code in the place where you get the temperature value from the sensor:
MQTT.pub('ESP8266/message', JSON.stringify({ sensor: i, temperature: t }));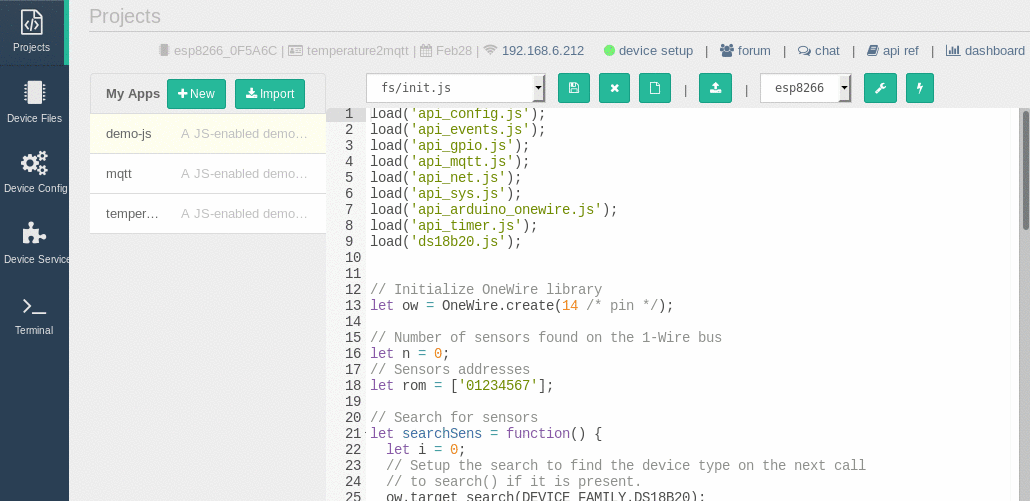
And we get the same result as with the first approach. What is the trade-off for the user-friendliness?
- You will have no idea about how ESP8266 connects to Wi-Fi and to MQTT broker via a secure connection.
- Javascript code sketch is shorter, and you don’t even need to read it all.
Conclusion: you won’t have full control and understanding of what’s inside the black box, but it’s easy to set up and deploy, and you don’t spend time on development.
Analogy for telematics-involved readers
The two approaches we discussed above resemble Wialon and flespi. On the one hand, you have Wialon with hundreds of supported protocols, many useful applications, and a feature-rich interface solving dozens of tasks out-of-the-box. So if you don’t have a pressing need or resources to get your hands dirty with coding, it is an excellent solution for you.
On the other hand, you have flespi with extended well-documented API, logging of all events, and manageability of all connections. You can dig deep and have the full understanding of what’s going on with your flespi-based application from a tracker connection to the API error codes. It does require certain development efforts on your side and understanding of the underlying processes, but we will deliver all the major infrastructural components.
When you delegate managing complexity to flespi, you never think about the following:
- how to parse messages from devices;
- how to store huge amount of telemetry messages;
- how to guarantee 99.9% uptime;
- how to support 50K active connections from tracking devices per single IP:port.
Think about flespi as of a telematics module that works. We will take good care of the internal complexity and leave you an easy part.