This article is a concentrated extract of everything you need to know to start using flespi universal device configurator. We’ll start with the “why?”, then move to “how?”, and hopefully, end up with a “wow!”.
What’s so special?
One-stop configuration tool. We wanted you to focus on the task, not on the tool. No need to install as many configurators as the number of manufacturers which devices you use (if all of them have one). No more switching screens and getting used to multiple workflows. All your devices are available in a single spot with handy filtering.
Visually engaging & feature-rich interface. We wanted it not only to work but also to look and feel good. The interface has undergone a few redesigns to become intuitive and functional. The settings are conveniently grouped into tabs based on their purpose. You can do most of the setup with mouse clicks only.
Easy device diagnostics and debugging. Every action performed to or by the device is carefully logged in a color-coded format with a human-readable description. You will always see if the setting change dispatched, what the device responded, which settings were affected, etc. Stay informed about every aspect of your devices’ operation.
Bulk updates. We know that fleet management is not about a few vehicles. It’s about a lot of vehicles. We know that configuring a lot of trackers can be a pain. So we alleviated it. If devices share the same setting and you need to change it to the same value, you just pick all devices you want to affect and send a command only once. No wasted time, the lesser chance of a human error, and simultaneous setting update across dozens of devices — isn’t it cool?
Integrability. flespi is not a turn-key solution, not an end-product. You can embed its configuration capabilities into your application with the help of a rich REST API.
“It does sound too good to be true. How do I try it out?”
1. Create a channel
A channel is a prerequisite for almost any operations in the flespi panel since it establishes a bi-directional pathway — for messages coming from a physical tracker and for commands departing to the tracker. Channels are protocol-specific — usually, devices from the same manufacturer share the same protocol.
Login to the flespi panel and open the Channels page.
Click the “+” button to add a new channel.
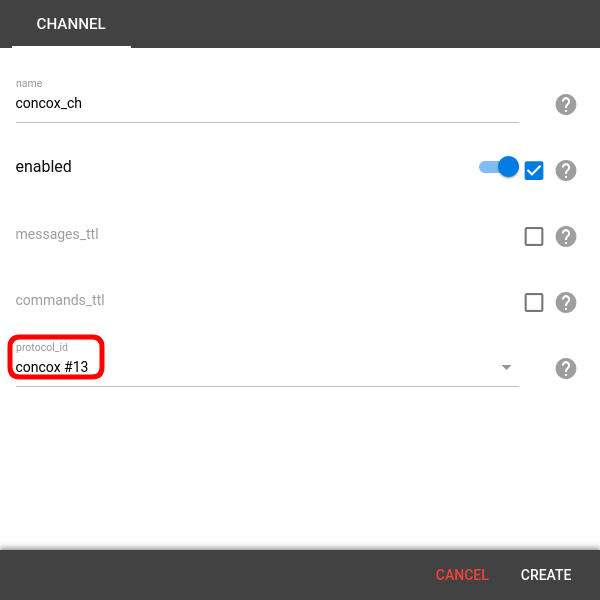
Pick a protocol matching your tracker’s manufacturer (I will be working with Concox in this article).
See also: How to create a channel in flespi [VIDEO]
2. Create a flespi device
To start managing your tracker with flespi, you need to add it to the flespi panel first.
On the Devices page click the “+” button to add a new flespi device.
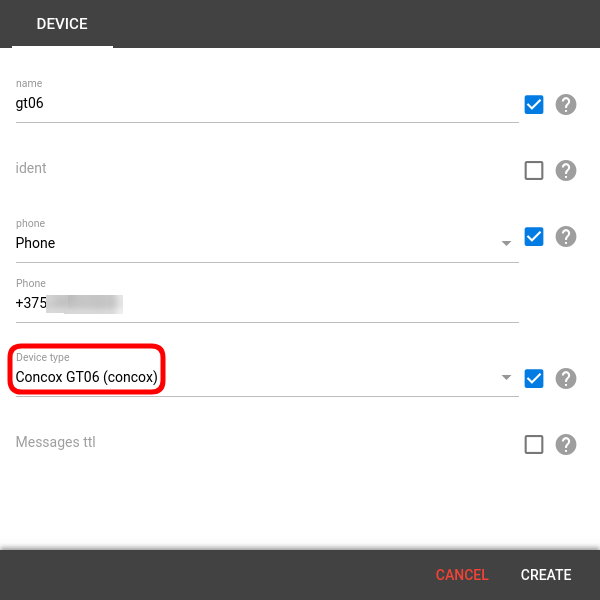
Give it a name, pick the device type, and enter the ident value (usually an IMEI) and/or the tracker’s phone number (needed for configuration via SMS).
We’ve taken Concox GT06N for demonstration:
See also: How to create a device in flespi [VIDEO]
3.1. Open configurator and change the device settings
Now that we tied your tracker to the flespi platform, let’s navigate to the configuration tool.
Click on the device card on the Devices page
Switch to the Settings tab and get the configuration that is right for you.
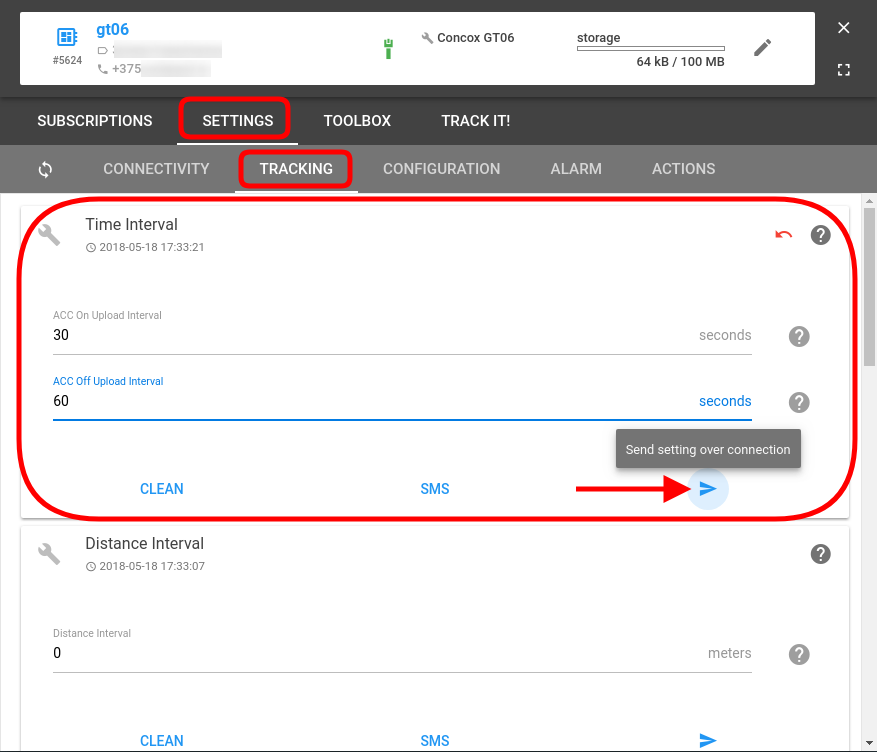
Besides configuring trackers via the Internet connection, flespi allows configuration via SMS (if the setting supports such transport type for the command). Free registration on flespi.io gives you 10 SMS a month to set up your trackers. The device settings supporting management via SMS will have the “SMS” button on the corresponding setting card.
A highly demanded bulk update feature is now available in our Setbox tool as well as via REST API (see section 3.2 below).
3.2. OR use REST API and embed the functionality to your app
Any action performed in the flespi panel has the REST API request corresponding to it (since it’s the REST API request that happens behind the scenes every time you make changes in the panel). This means that you can integrate all bits and pieces of flespi device configuration functionality into your applications in a convenient and flexible way.
Each setting for each supported type of tracker has a schema determining its structure. Schemas for building the setting configuration request live in the settings field of the corresponding device. Let’s look closer at the Time interval setting that we changed above using the graphical interface:
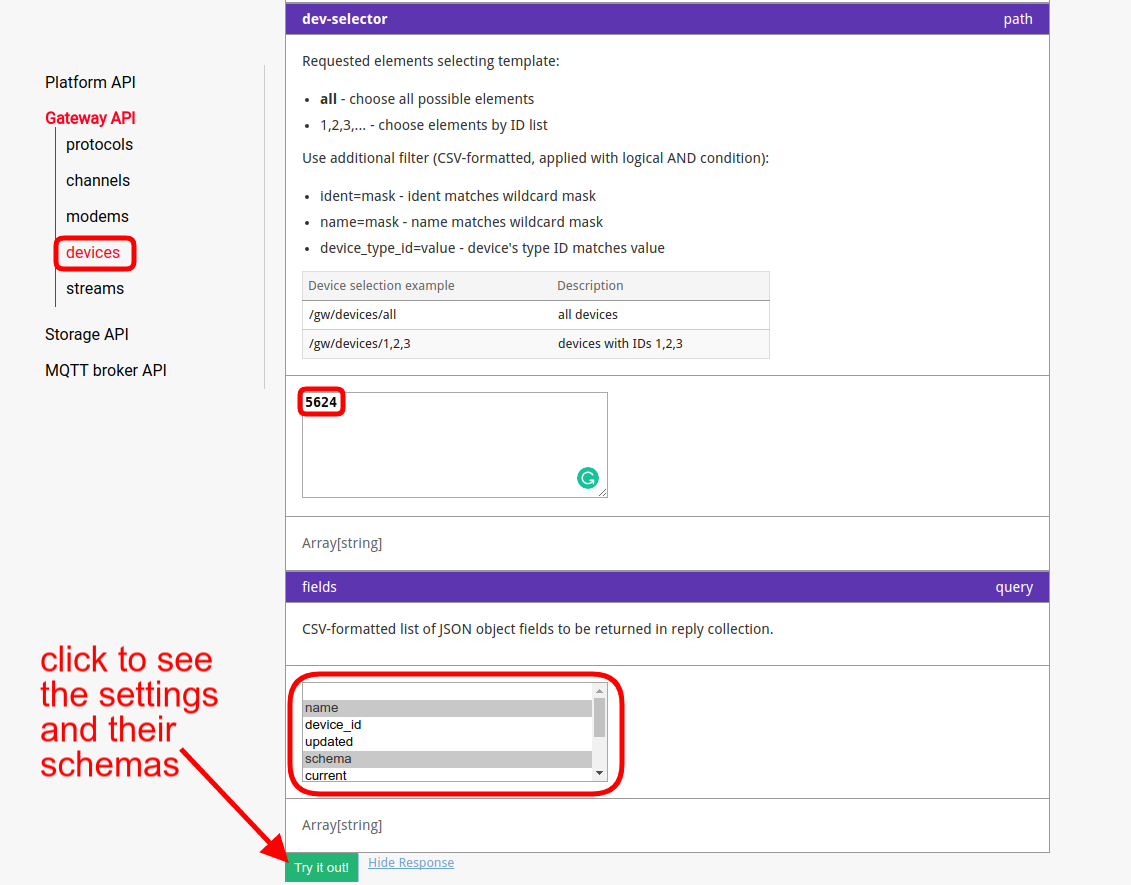
Here’s how the schema for the Time interval setting looks:
   {
      "address": [
        "connection",
        "sms"
      ],
      "current": {
        "time_off": 30,
        "time_on": 10
      },
      "name": "time_interval",
      "schema": {
        "additionalProperties": false,
        "description": "GPS Data Upload Time Interval",
        "properties": {
          "time_off": {
            "description": "Time interval to upload GPS data when ACC is OFF",
            "maximum": 18000,
            "minimum": 5,
            "title": "ACC Off Upload Interval",
            "type": "integer",
            "x-view-unit": "seconds"
          },
          "time_on": {
            "description": "Time interval to upload GPS data when ACC is ON",
            "maximum": 18000,
            "minimum": 5,
            "title": "ACC On Upload Interval",
            "type": "integer",
            "x-view-unit": "seconds"
          }
        },
        "required": [
          "time_on",
          "time_off"
        ],
        "title": "Time Interval",
        "type": "object",
        "x-view-order": [
          "time_on",
          "time_off"
        ]
      }
    },
Parameters time_on and time_off in the schema correspond to their humanized versions — “ACC On Upload Interval” and “ACC Off Upload Interval”. So, how do we change the setting via a REST API request? We will need a PUT method, the setting name, the device id:
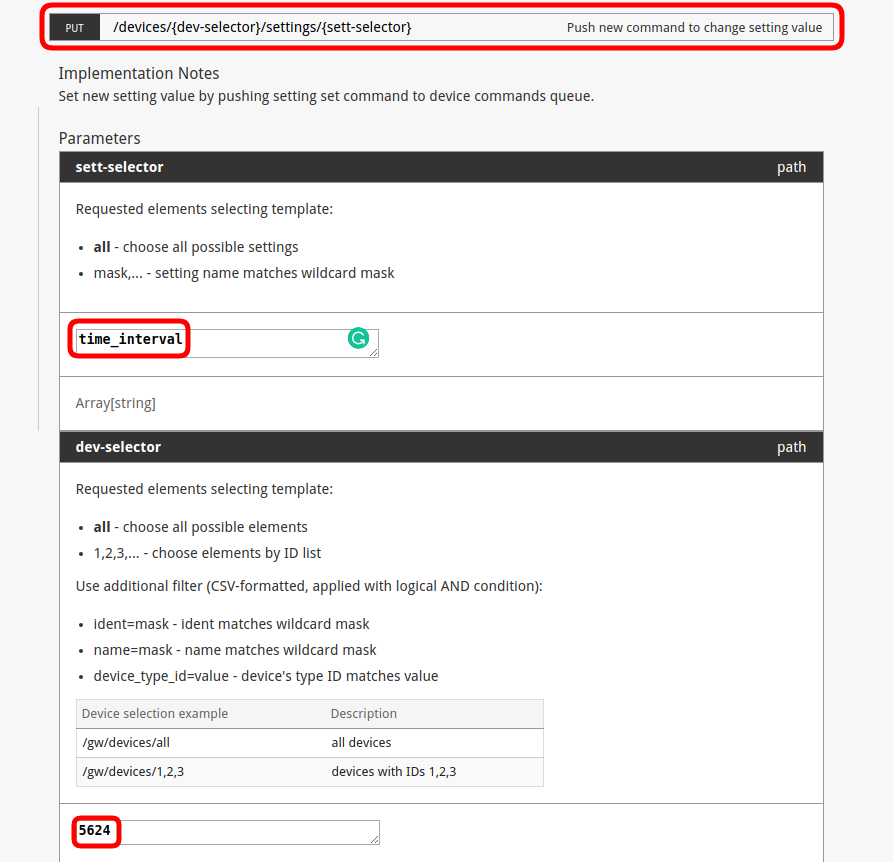
Note: making the bulk setting update via REST API requires listing the ids of the respective trackers in the request.
The address field determines how the setting change will happen — over the Internet connection or via SMS.
A schema is an object, so we will be changing the object properties, namely time_on and time_off and give them the values 30 and 60 accordingly.
Hit Try it out! button to execute the request.
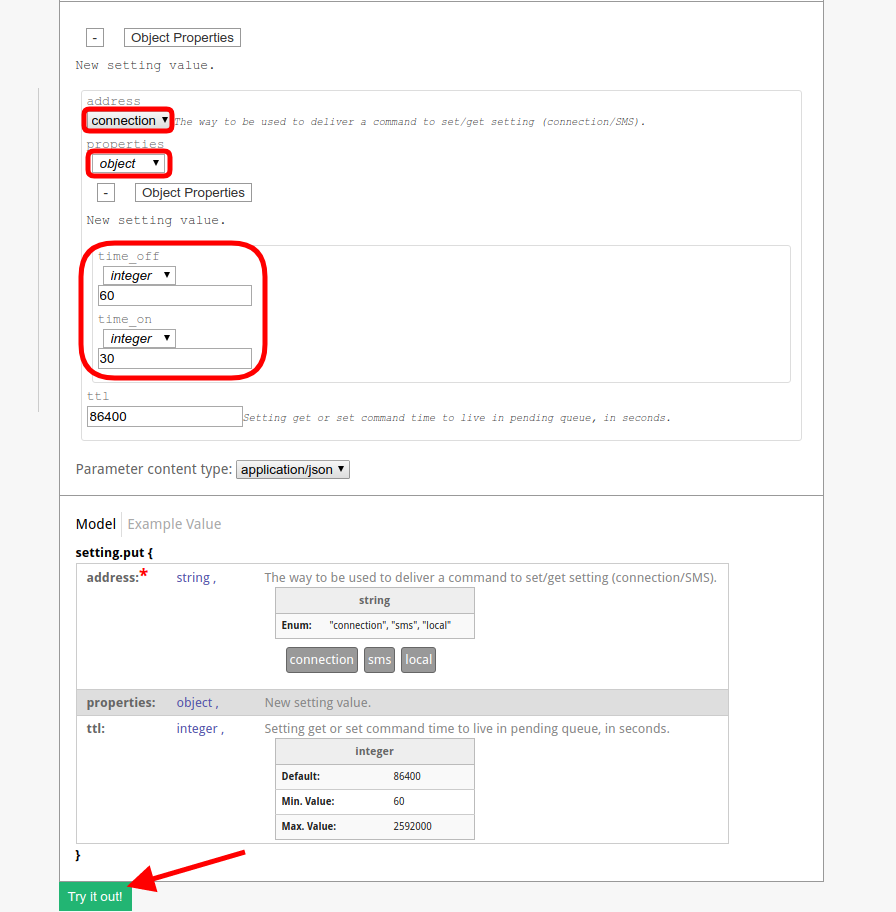
Here’s how the corresponding curl looks like:
curl -X PUT --header 'Content-Type: application/json' --header 'Accept: application/json' --header 'Authorization: FlespiToken XXXXX' -d '{"address":"connection","properties":{"time_off":60,"time_on":30},"ttl":86400}' 'https://flespi.io/gw/devices/5624/settings/time_interval'Use our interactive swagger-based documentation to test various REST API requests and get an instant response.
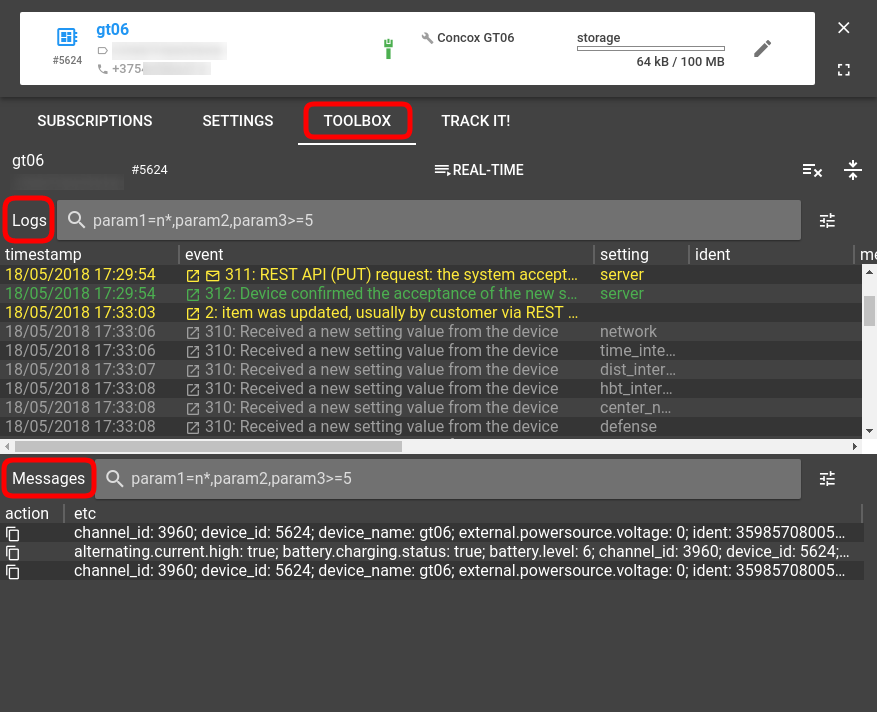
4. Refer to the logs to debug issues (if any)
The card of any individual channel or device includes a Toolbox tab that records all events related to the given element. You can easily see the logs for the specific date and switch between real-time and history modes:
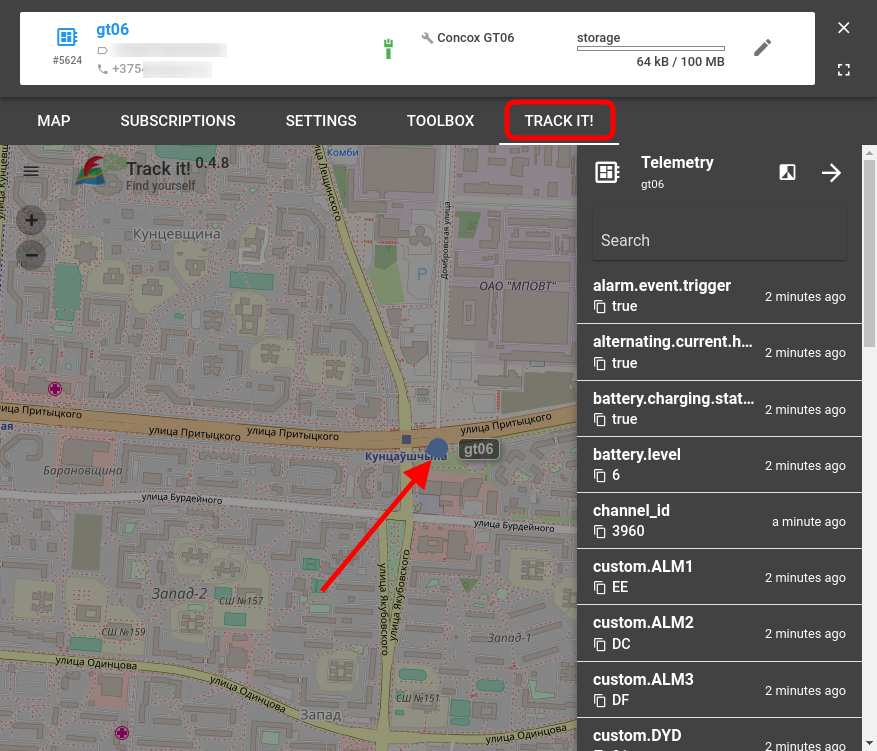
5. Do basic GPS monitoring in one click
Every device card also features a Track It! tab which shows you the location of the selected device on the map (if the device is sending its position data). The screen also gives the telemetry data — the latest states of all device parameters.
6. Enjoy the “startup mode” for life
We hope you enjoy the opportunities the flespi device configurator brings along and can already envision how it will make your life better. As the icing on the top, we want to highlight that you are welcome to use the flespi platform for free with no time constraints. The free use includes 10 flespi devices which means you can manage up to ten trackers at no cost. Should you decide to extend, you’ll have to look at the commercial plan which will allow 1000 flespi devices for a flat fee of $100 (and each additional 100 devices for $1).
***
flespi universal device configurator keeps growing rapidly as we try to meet the demands of the customers and the industry. There’s a lot more to come in the upcoming months, so stay tuned for updates.
And if you feel we missed something important, let us know.