Webhooks were released to the public a few months ago. As we see the interest from our clients grow and our tech support guys offer webhook-based solutions more often, we want to share some practical examples of how this functionality can be used and where it applies.
BTW, you can find the technical instructions on how to use webhooks here.
Just a quick reminder: webhooks trigger when a specified event (MQTT topic) occurs and perform a specified HTTP request, either internally (to the flespi platform) or to a third-party service.
The definition above seems very broad, but so are the potential uses of webhooks — they can be applied in a wide variety of “if-this-then-that” situations. Let’s take a look at some specific use cases.
Case 1: Auto-create devices
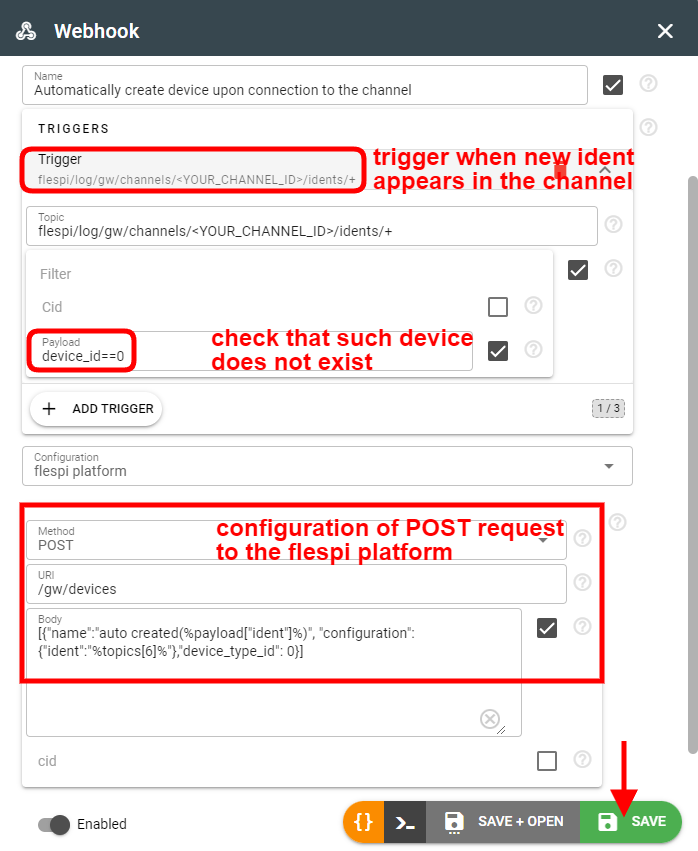
This one is pretty straightforward — once the new connection to the channel is established, webhook will initiate creation of the new flespi device:
The webhook will be watching the MQTT topic for channel logs and will trigger once the “connection identified” event occurs.
The resulting action is a POST request to the flespi platform that creates the new device with the ident taken from the channel message payload.
Note: %topics[6]% means “take the 6th element of the given topic (starting from 0)”. In our case, the topic is flespi/state/gw/channels/<YOUR_CHANNEL_ID>/idents/+, so the 6th element is the “+” wildcard that expects new device ident:
| flespi | log | gw | channels | + | idents | + |
| 0 | 1 | 2 | 3 | 4 | 5 | 6 |
Note that by default the device_type_id is set to 0, however, you need to replace it with the proper value — use this request to find the device_type_id corresponding to the specific model.
Case 2: Add devices to the group
Groups offer handy automation functionality — assigning a stream, a plugin, or a calculator to a group of devices automatically applies to ALL devices in the group.
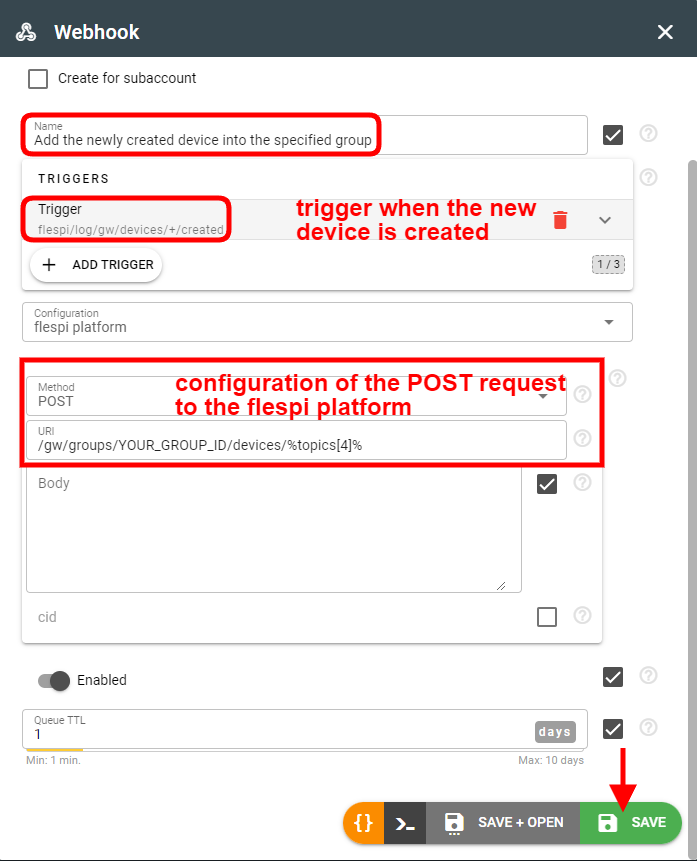
The webhook will be catching the “device created” event in the respective MQTT topic.
The action represents a POST request that will assign a device with the specific id into the specified group.
Note: %topics[4]% means “take the 4th element of the given topic (starting from 0)”. In our case, the topic is flespi/log/gw/devices/+/created, so the 4th element is the “+” wildcard that expects device id:
flespi | log | gw | devices | + | created |
0 | 1 | 2 | 3 | 4 | 5 |
All possible variables that can be used in the webhooks' configuration are described here.
Case 3: Add device connect/disconnect events into the messages history
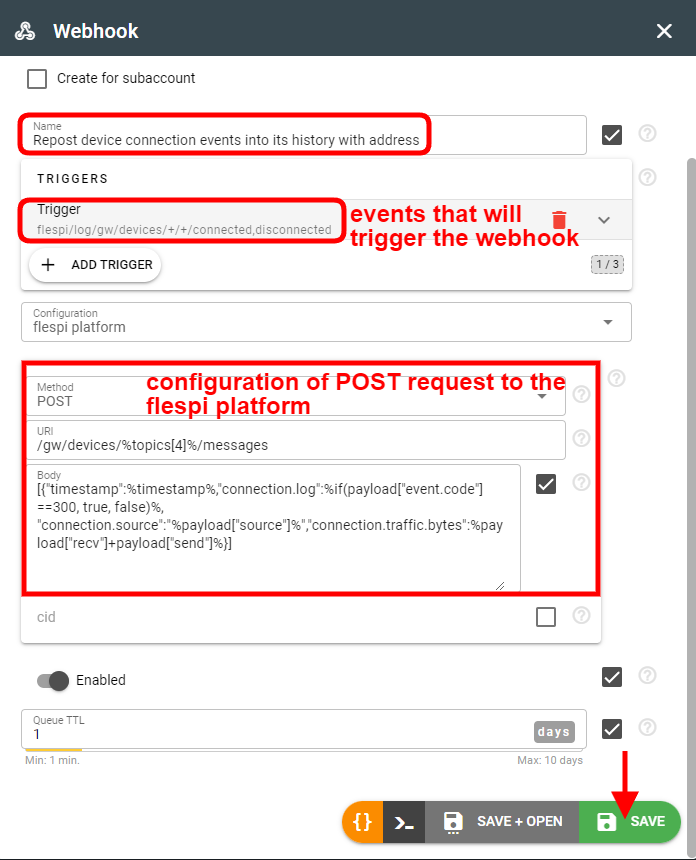
How about having records about critical events (taken from the log) injected into the device messages flow? Below is the webhook configuration that will catch the connect/disconnect events.
The webhook will be catching the “device connected / disconnected” event in the respective MQTT topic.
The action is a POST request that will add a record about device losing / re-establishing connection into the device messages.
Note: %payload[“source”]% notation is used to access sub-fields in the payload (provided the payload is a JSON object).
Notice that the body of the POST request can contain rather complex instructions, including conditions and other logic supported by the flespi expressions.
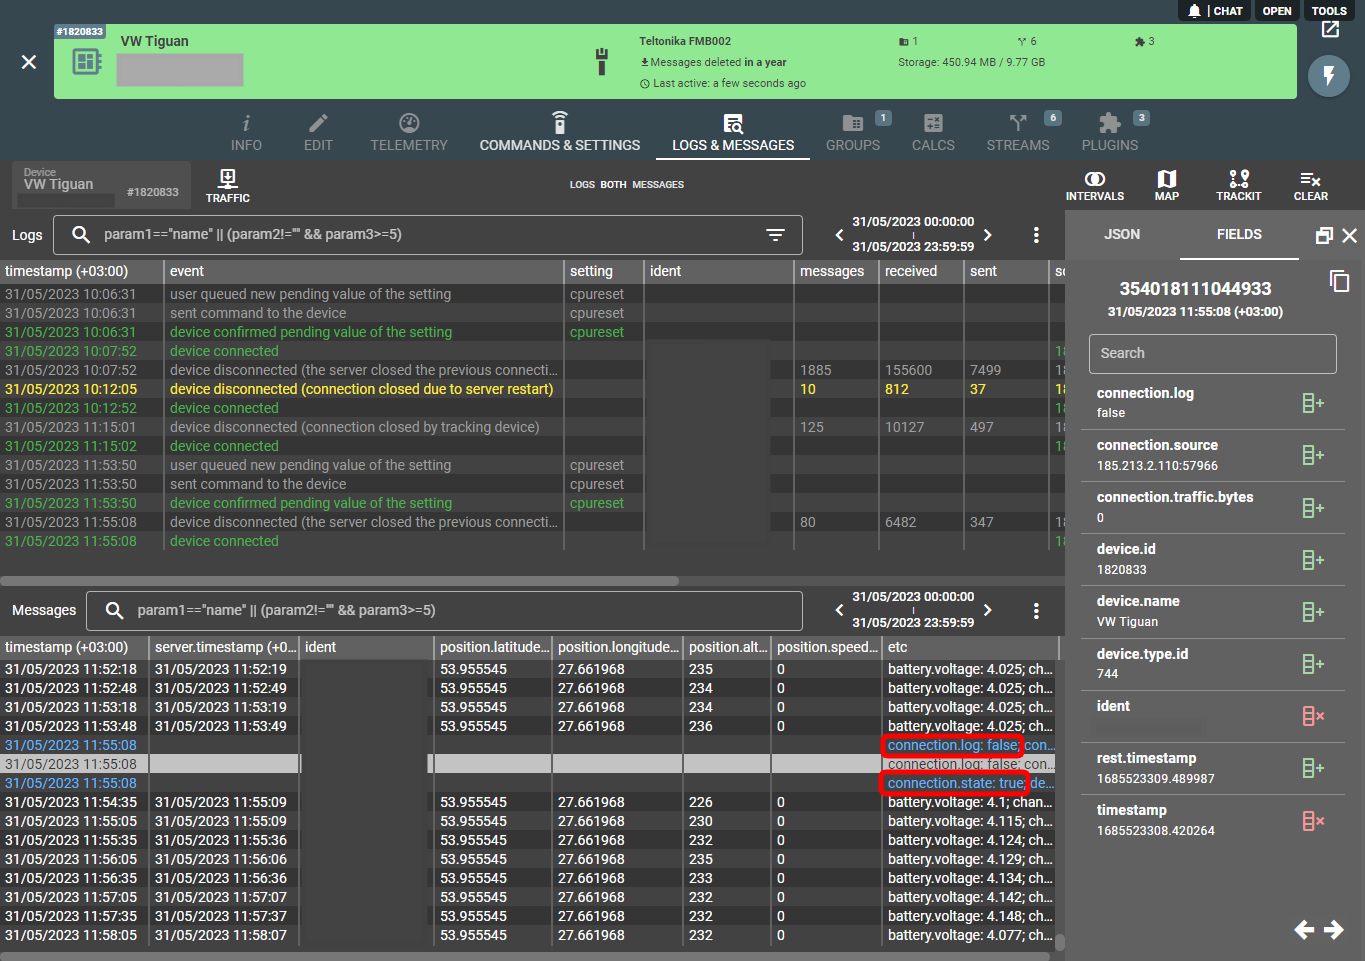
Here are the resulting messages with injected connect / disconnect events:
Case 4: Telegram notifications about channel blockage
Our users are not supposed to monitor the state of affairs in their flespi panel on a permanent basis. They do business. However, since their business processes can rely on the dataflow from flespi, they need to be sure that flow is reliable and get notified if interruptions occur. For that purpose, we suggest using a Telegram bot.
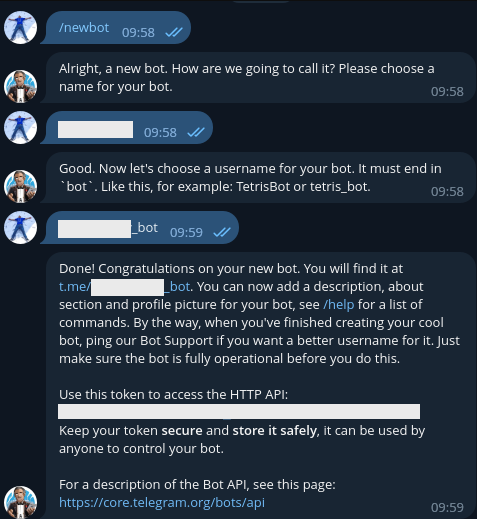
First, open https://t.me/BotFather, click on the "Menu" button, select the /newbot command, and follow the steps to create the bot.
At the end, you will be provided with your bot's token.
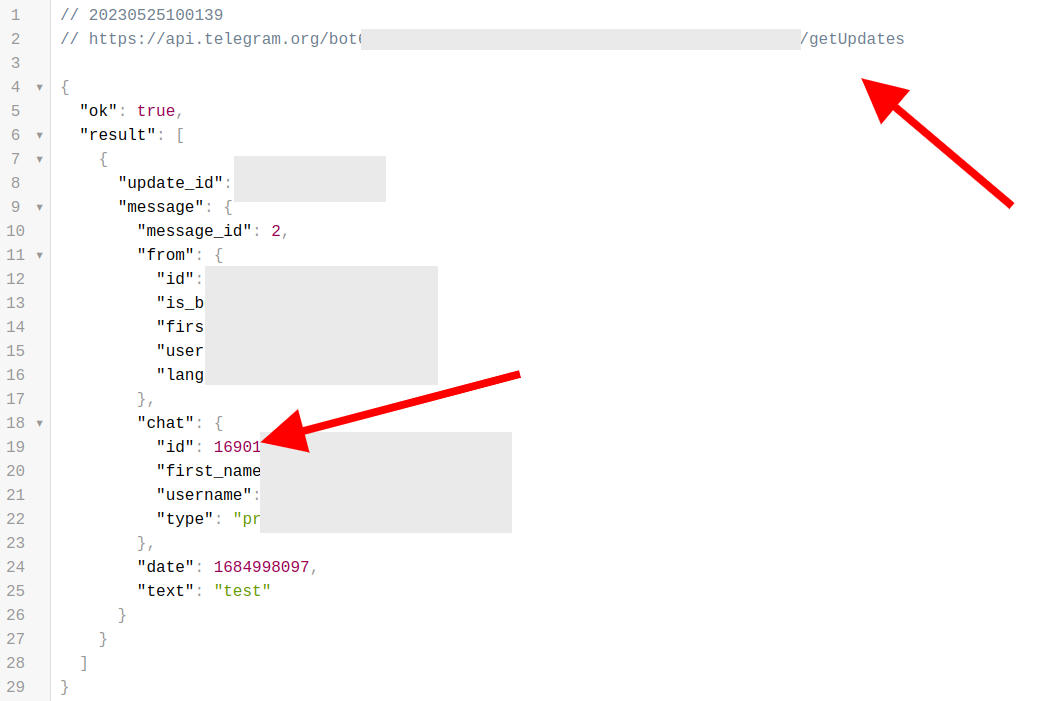
Now we also need to obtain the chat ID. To do this, go to the chat of the created bot and send it any message.
After that, open the following URL in your browser and find the chat ID that we need:
https://api.telegram.org/bot<YOUR_BOT_TOKEN>/getUpdates
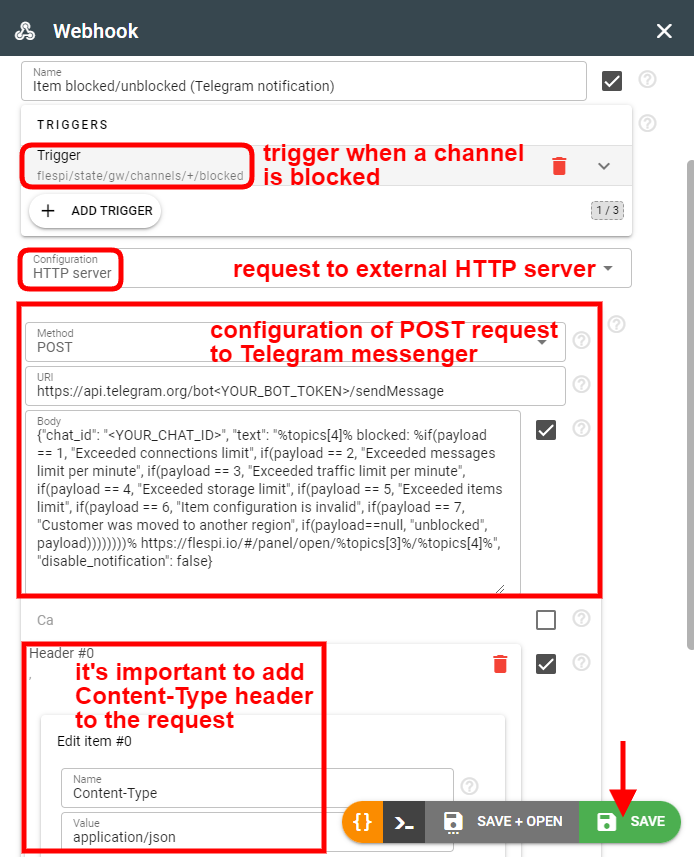
We are ready to create a webhook now. Let’s teach it to react to channel blocked events. We will be monitoring the following topic: flespi/state/gw/channels/+/blocked.
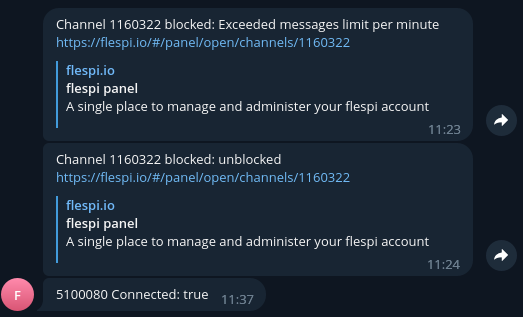
Note how we extensively use expressions in the body of the POST request to specify the exact reason of the channel blockage. Here’s how the resulting notifications look in the Telegram bot:
This scenario can be easily adapted to sending notifications about other events critical for your business — stream blockage, device connects/disconnects, etc.
Case 5: Email notification about low battery
The scenario can be like this: “if the device battery level drops below 20%, send an email notification”.
Since this case is dependent on your email client and script language preferences, we cannot provide the exact solution, but will provide the implementation flow:
create a calculator that will create an interval when the device battery drops below 20%

a trigger of a webhook will be watching the topic about creating an interval, something like flespi/interval/gw/calcs/{id}/devices/+/created
as an action, the webhook will call a script on your server that will send an email (this is an external part that should be implemented on your side in the way you deem necessary).
***
The examples 1-4 above are available as templates upon webhook creation. This article is called to give you a better understanding of the principles of configuring webhooks, their flexibility and configurability, so that you can confidently tweak the existing presets or create the new webhooks from scratch. Example 5 is there to illustrate how complex the webhook-based solutions can be. If you ever get stuck, don’t hesitate to write us in the chat.
If you have another ideas on how webhooks can be used or how you are using them, please share these ideas in the comments below 👇
