- Essentials
- How channels work
- Types of channels
- How to create a channel?
- How to point a tracker to the channel?
- Channels API
- Troubleshooting
- What's next?
Essentials
- A channel is an entry point for messages from tracking devices or other platforms.
- Channels are an indispensable part of any flespi project — there’s no other way to feed the data to flespi.
- A channel operates via a single protocol which means that one channel can receive messages from tracking devices of one manufacturer.
- A channel has a unique dedicated host:port to point your tracking devices to.
- Maximum TCP connection timeout is 10 minutes and it can not be configured. We recommend to activate 5 minute heartbeat interval on the devices where it is applicable to prevent TCP connection close by the channel.
How channels work
Channel handles connections from tracking devices, parses the incoming data, and stores parsed messages in the internal buffer (100 MB for the free account, 10 GB for the commercial account) for 30 days. It's important to promptly take parsed messages away from the channel buffer and clear it regularly to avoid channel blocking due to buffer overflow. This article explains how to get messages from flespi.
Channel stores messages ordered by the time they were reported to the channel (server.timestamp). Device may indicate any timestamp (rtc clock value when telemetry was gathered) in the message but channel messages are stored, cleaned and accessed according to the time they arrived in the channel. So even messages from the past or the future will be easily visible in the channel's messages buffer.
As the channel is responsible for connections to devices, you can manage them via API. You can see raw traffic split by identified devices and list or manually close each connection.
After creating the channel the next logical step is to create flespi devices of a specific device type to get additional functionality such as telemetry, remote configuration and remote control via API, dedicated long-term storage, plugins, and more.
Channels have per-plan limits on the maximum number of active connections, traffic, or messages passed through the channel per minute. When the active connections limit is reached, the channel pauses listening (the operating system queues new attempts in the TCP backlog), and unidentified connections are dropped first to prioritize identified devices. When traffic or message-rate limits are exceeded, only the top-consuming devices are disconnected individually for one minute; the rest of the channel keeps running. A full channel block is used only as a last resort.
IP whitelisting: if you filter the traffic on MNO towards flespi channel's IP, please be sure to whitelist subnet 185.213.2.0/24 that is operated solely by flespi.
Types of channels
flespi supports 140+ channel protocols.
A channel can accept and parse the data from any device model of the manufacturer developing a given protocol.
Some channels can accept data from custom solutions. The following protocols can be set up to receive data from custom sources:
-
MQTT channel — subscribes for the specified topic of any MQTT 3.1.1 or 5.0 compliant broker and accepts plain JSON-formatted messages.
-
HTTP channel — accepts HTTP POST requests with messages as a request’s data parameter.
-
Wialon IPS, Wialon Combine — open protocols specifications (text and binary). May be used by device manufacturers or applications that must reduce traffic usage.
-
Wiatag — accepts data from Wiatag mobile application. Can be used for debugging, prototyping or small projects.
-
Telegram — pulls messages received by Telegram bot.
-
Proxy — can be used to split TCP traffic from one device to several platforms and to see HEX data from connections.
There are several types of devices that can work with one pre-configured platform and cannot be re-configured. flespi has API-based integrations with 10+ such platforms.
Wialon retranslator protocol is supported by many telematics platforms and can be used for cross-platform integrations too.
To analyze raw traffic in any channel, use the Traffic Viewer tool.
To forward the parsed data from your channels, explore our streaming options.
In some cases, channel provides a secondary URI to serve connections from auxiliary device modules such as tachographs and cameras.
How to create a channel?
- Log in to the flespi panel
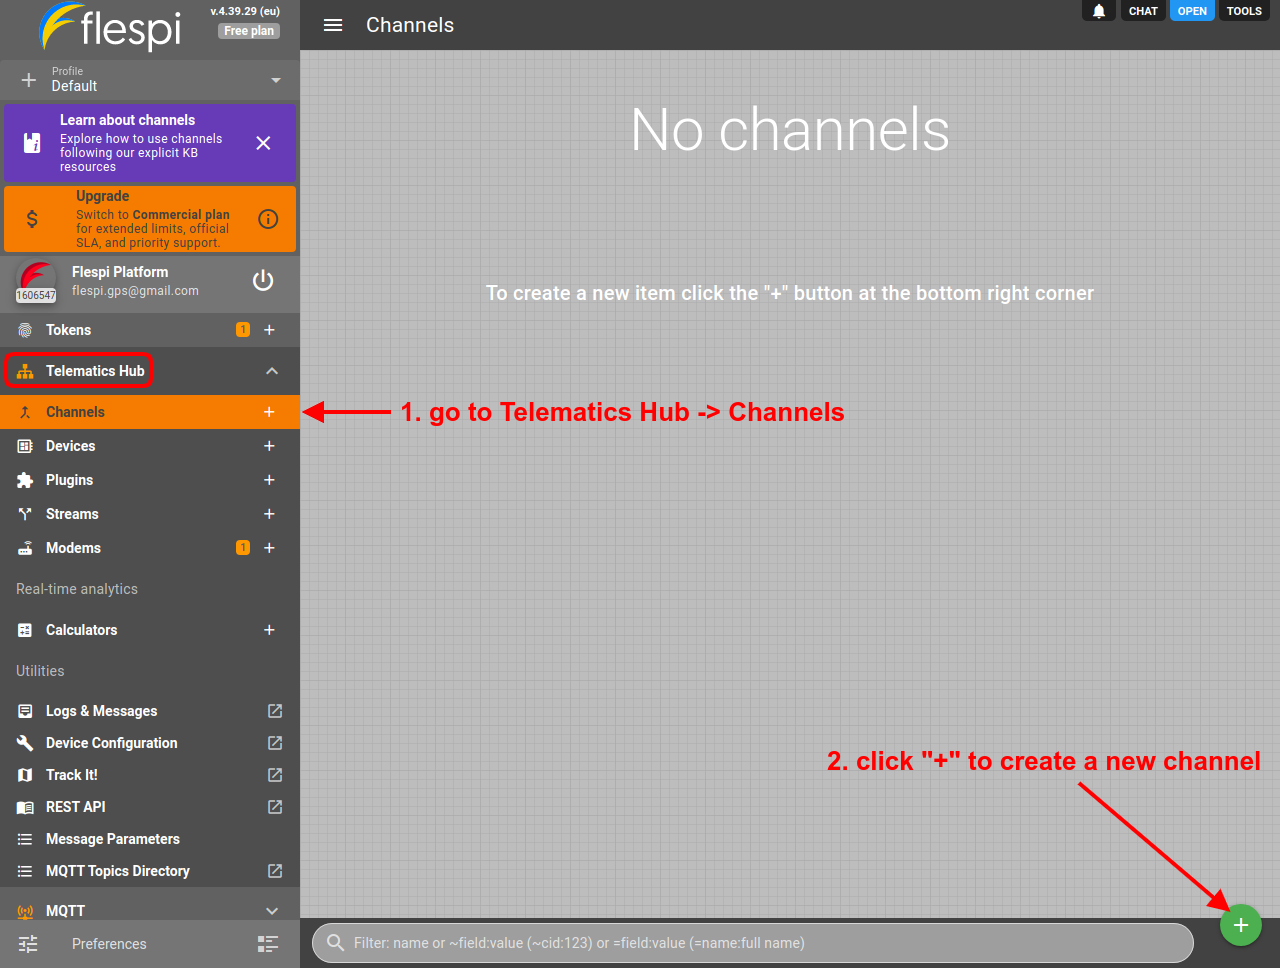
- Navigate to Telematics hub -> Channels and click the "+" button in the bottom right corner to add a new channel:
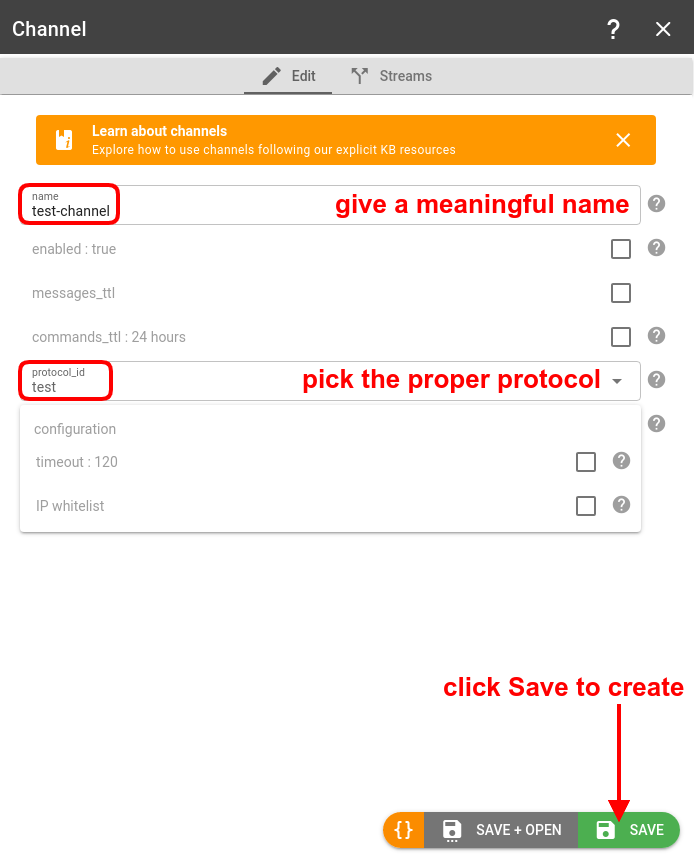
- Give the new channel a meaningful name and pick the channel protocol from the protocol_id drop-down:
- Configure your GPS trackers to send the data to the channel's unique host:port:

Important! We strongly recommend to point your trackers to the DNS of the channel's URI (in host:port format) and not to the IP address behind that DNS since we might change that DNS record without prior notice to point to different IP addresses to mitigate DDoS attacks.
How to point a tracker to the channel?
Open the device configuration tool provided by the manufacturer, find the Server settings setup and paste the host and port of the created channel there.
Alternatively, you can send a respective command to the device via SMS. The format is usually given in the protocol specification.
If you do not know how to do this please check our quick start guide for specific instructions that you can use to connect devices from most popular manufacturers to your flespi channel.
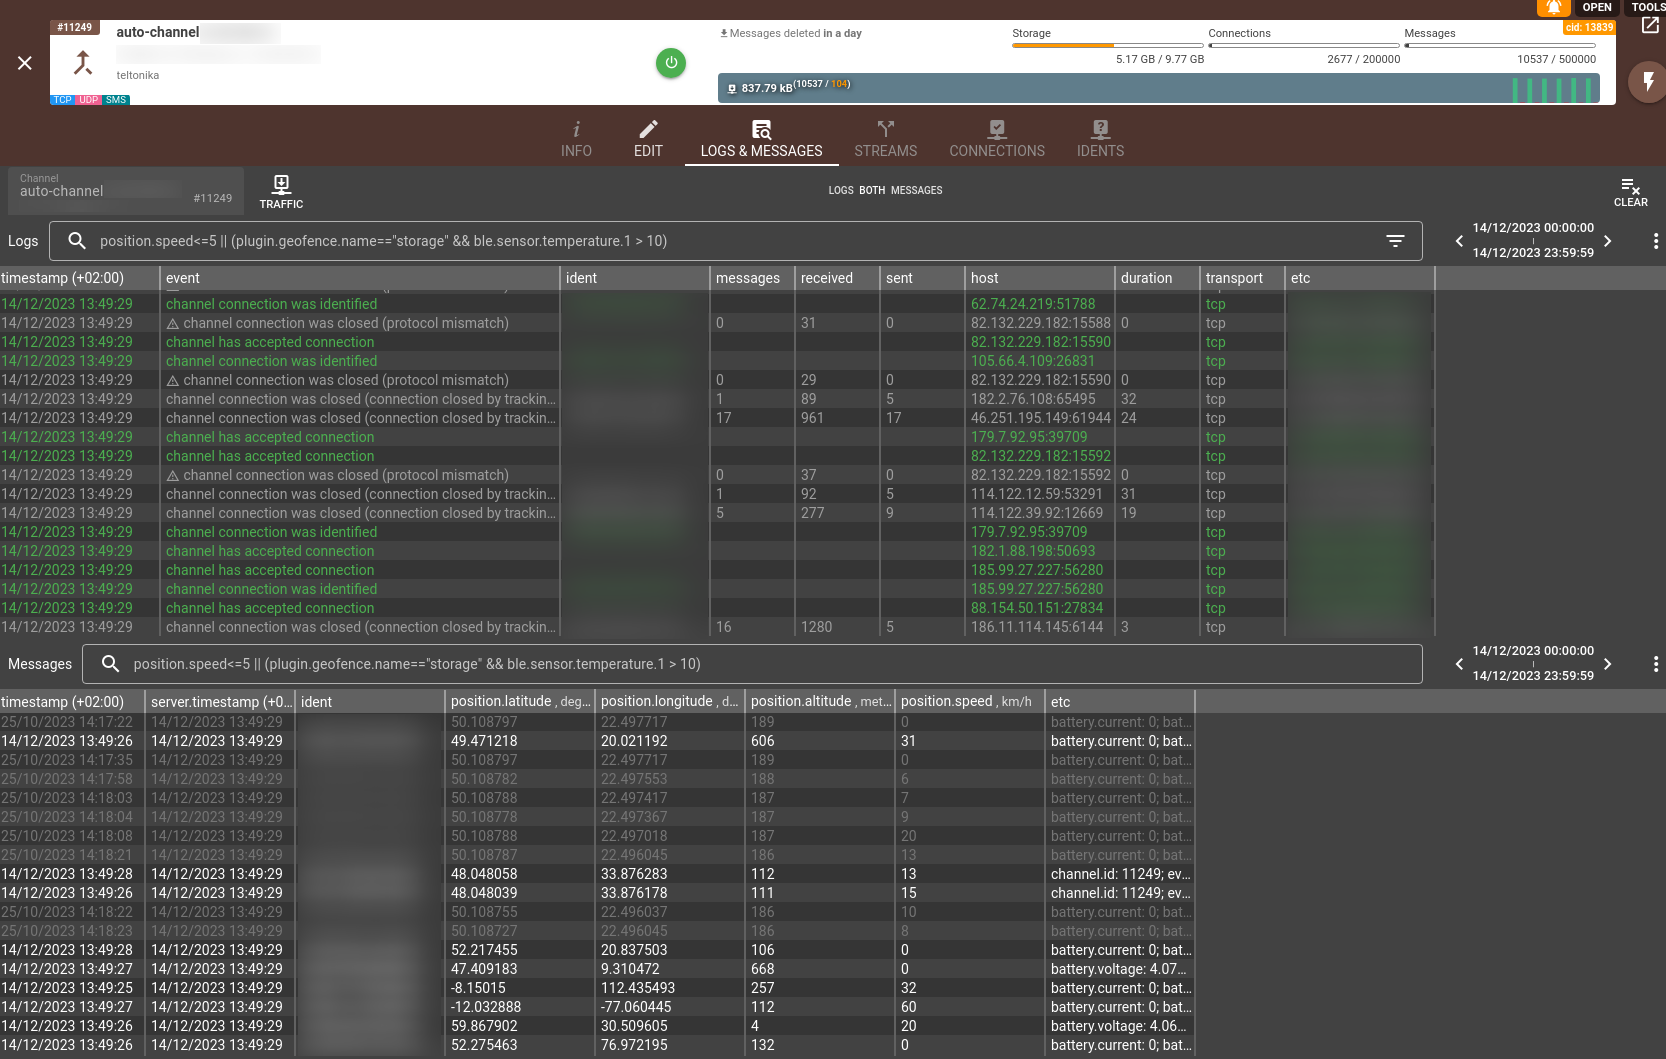
If everything is set up correctly, messages from your device should start coming to the channel. You can check this on the Logs & Messages tab for the channel.
The channel interface includes two important tabs: Connections and Idents.
Connections and idents tabs
The Connections tab displays current device connections and offers several management options. You can filter and sort the connections list according to your needs. The "Connection history timeout" setting allows you to configure how long disconnected devices remain visible in the list. For active connections, you have the option to forcibly close them. Additionally, there's a "Create devices" button that enables bulk device creation.
The Idents tab similarly allows sorting and filtering of registered device identifiers. It also features two important buttons:
- A "Create devices" button for bulk device creation
- A "Create webhook for devices auto-creation" button that sets up automatic device creation when new devices connect to the channel.
When using the webhook functionality, you'll need to specify the device type that will be assigned to all auto-created devices. Once configured, the webhook will trigger automatically whenever a new device identifier is registered in the channel.
Channels API
To perform any operations with the channels, use the channels API.
Troubleshooting
In case of any issues, check the Logs & Messages tab on the channel screen:
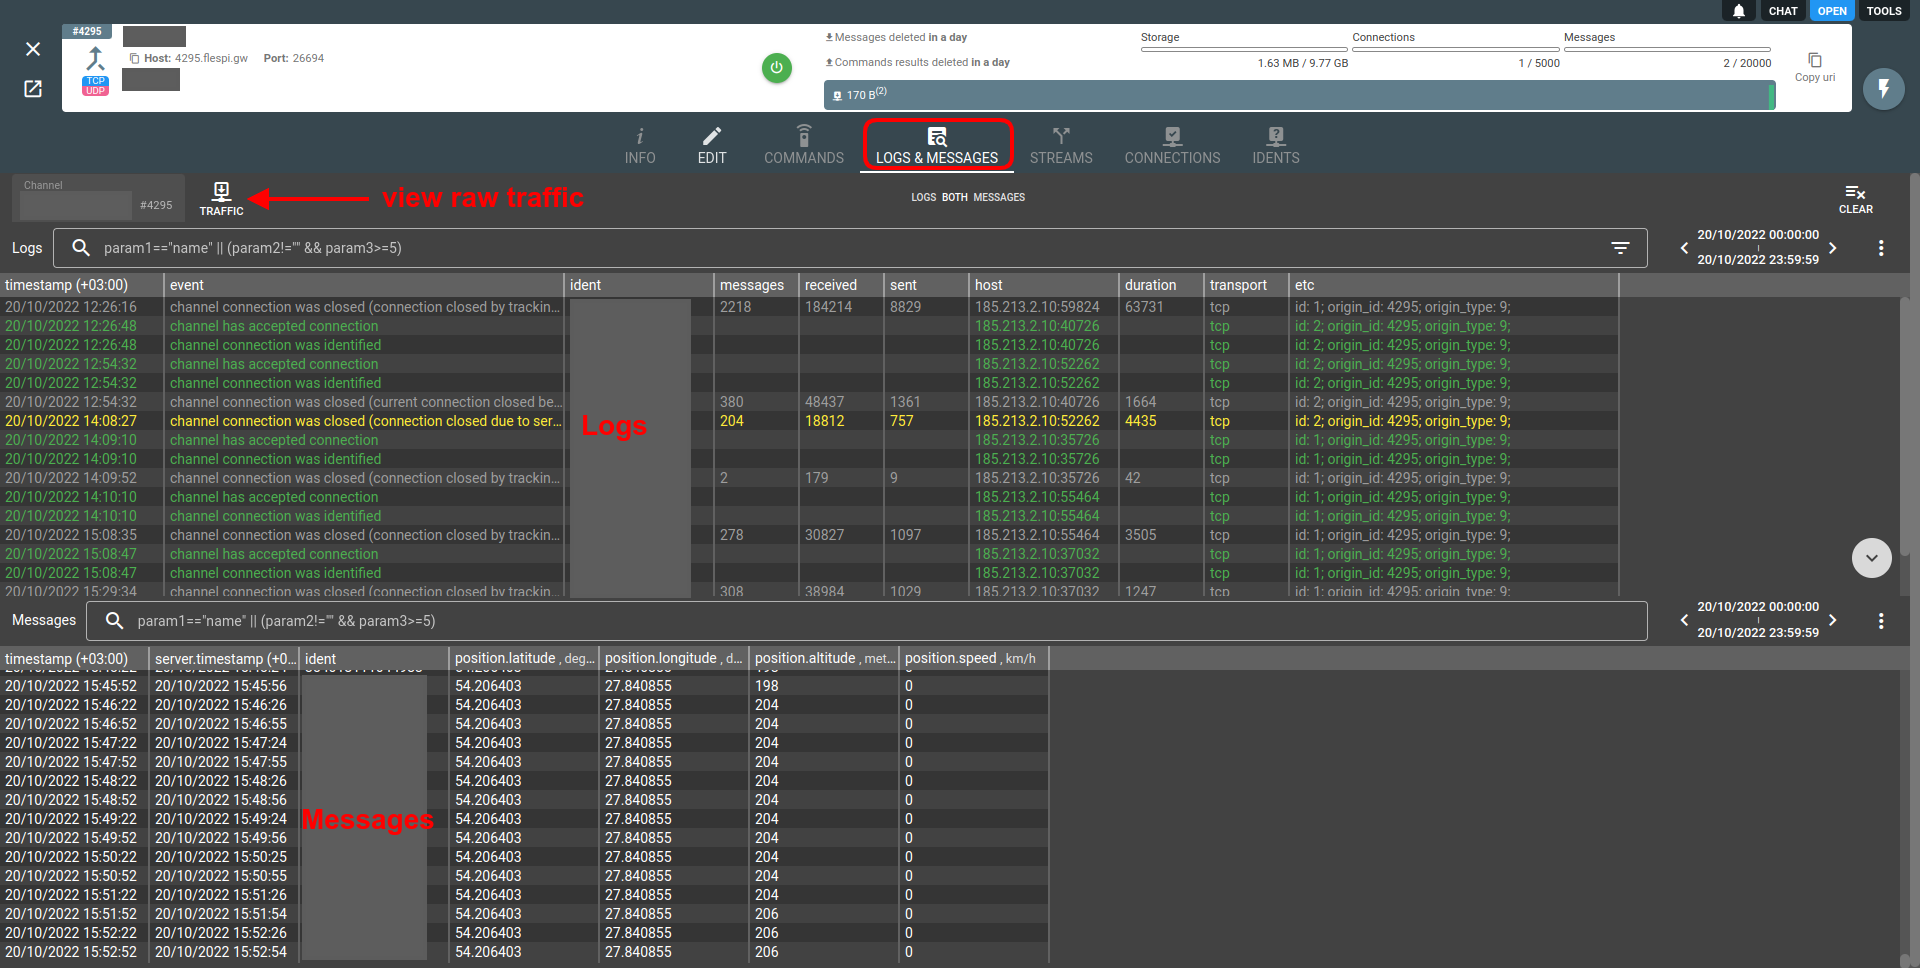
Use raw traffic viewer to investigate parsing issues.
If your channel is blocked either by traffic, active connections count or amount of registered messages consider upgrading your flespi plan to the next or create one more channel working on the same protocol and split the load between them. If you are working with devices they can seamlessly communicate via any such channel in the account. Also you may apply flespi analytics to detect devices that generate the highest messages registration frequency and isolate them.
If you have troubles with device identification on a channel that server more than 1000 of active connections we suggest to create a dedicated channel to solve any issues there. You will be able to track any connection attempt to the channel and in traffic you may explore traffic under "unidentified" ident. This is a special catch all bucket for all traffic from devices that were not able to identify themself correctly withing 15 seconds timeout after connecting to the channel.
If you accidentally deleted channel to which hundreds or even thousands of your devices are configured to you may try to restore it from recycle bin within 30 days.
Channel is processing messages from multiple connections in parallel. However in each connection messages are being processed in a serial mode - one by one. Channel picks next device message for processing only when previous message is fully processed by plugins and stored in the database. For certain channel protocols where within a single connection multiple device idents are delivered (wialon-retranslator, ble-beacons, pipe-cache-params, mqtt, etc) this can be a reason of bottleneck. To improve it we recommend to split devices in such protocols on multiple channels keeping up to 1,000 - 5,000 devices per channel. You can expect from the channel to process from each connection up to 2,000-5,000 messages per minute. In certain cases setting messages_ttl for the channel to zero may significantly improve single-connection performance of the channel. Also consider removing plugins that queries 3rd party services (e.g. geolocation) upon their operation.
What's next?
- To start using flespi at full scale, create a device operating via your channel's protocol.
- In case of any issues, check our troubleshooting checklist.
Before you will start using flespi on a full scale we suggest to watch detailed videos from our conference. Invest your time into watching them now to save much more time and money later, when you will implement your project: