Streamax offers a comprehensive range of video devices and dashcams tailored for various industries, including transportation, law enforcement, and logistics. Here's how you can obtain video telematics data from Streamax devices in 6 easy steps:
Create a free account on flespi.io
Create a device in flespi
Manage your media in the dashboard
Access your media via API
1. Create a free account on flespi.io
First open flespi.io and create a free account or login with your credentials (you can proceed with your Google account for a quick sign-in).

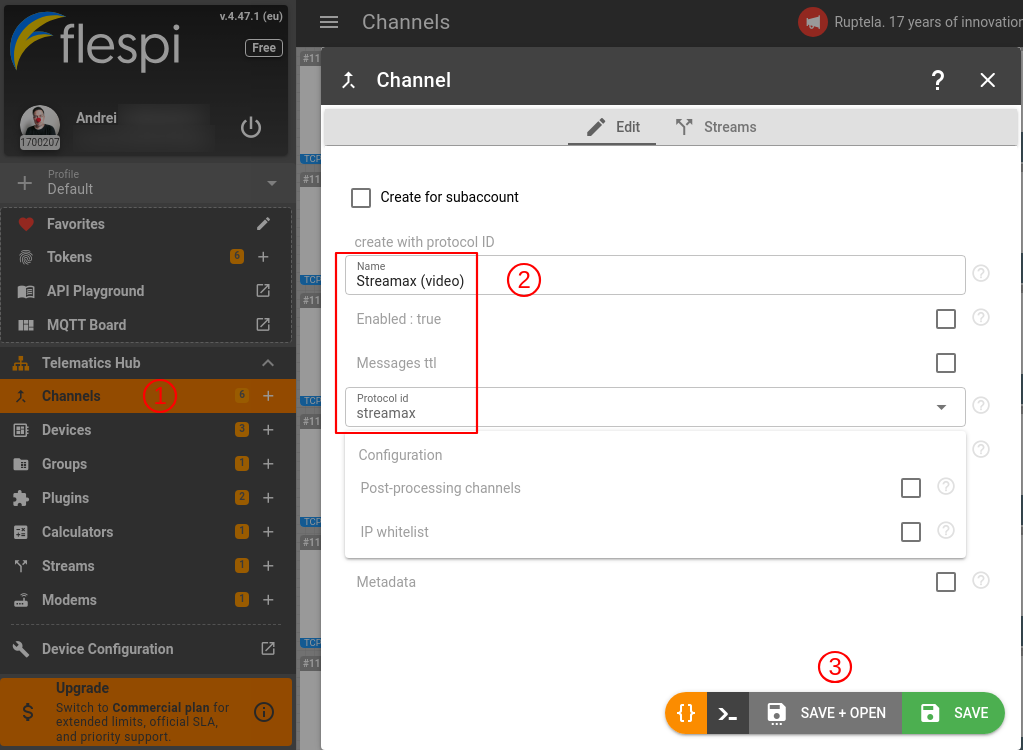
2. Set up a Streamax channel
In the flespi panel, you need to create a channel first. Follow to the Telematics Hub > Channels and click the '+' button. Name your channel and select ‘streamax’ as the ‘Protocol id’, then click on 'SAVE + OPEN'.
3. Point your device to Streamax channel
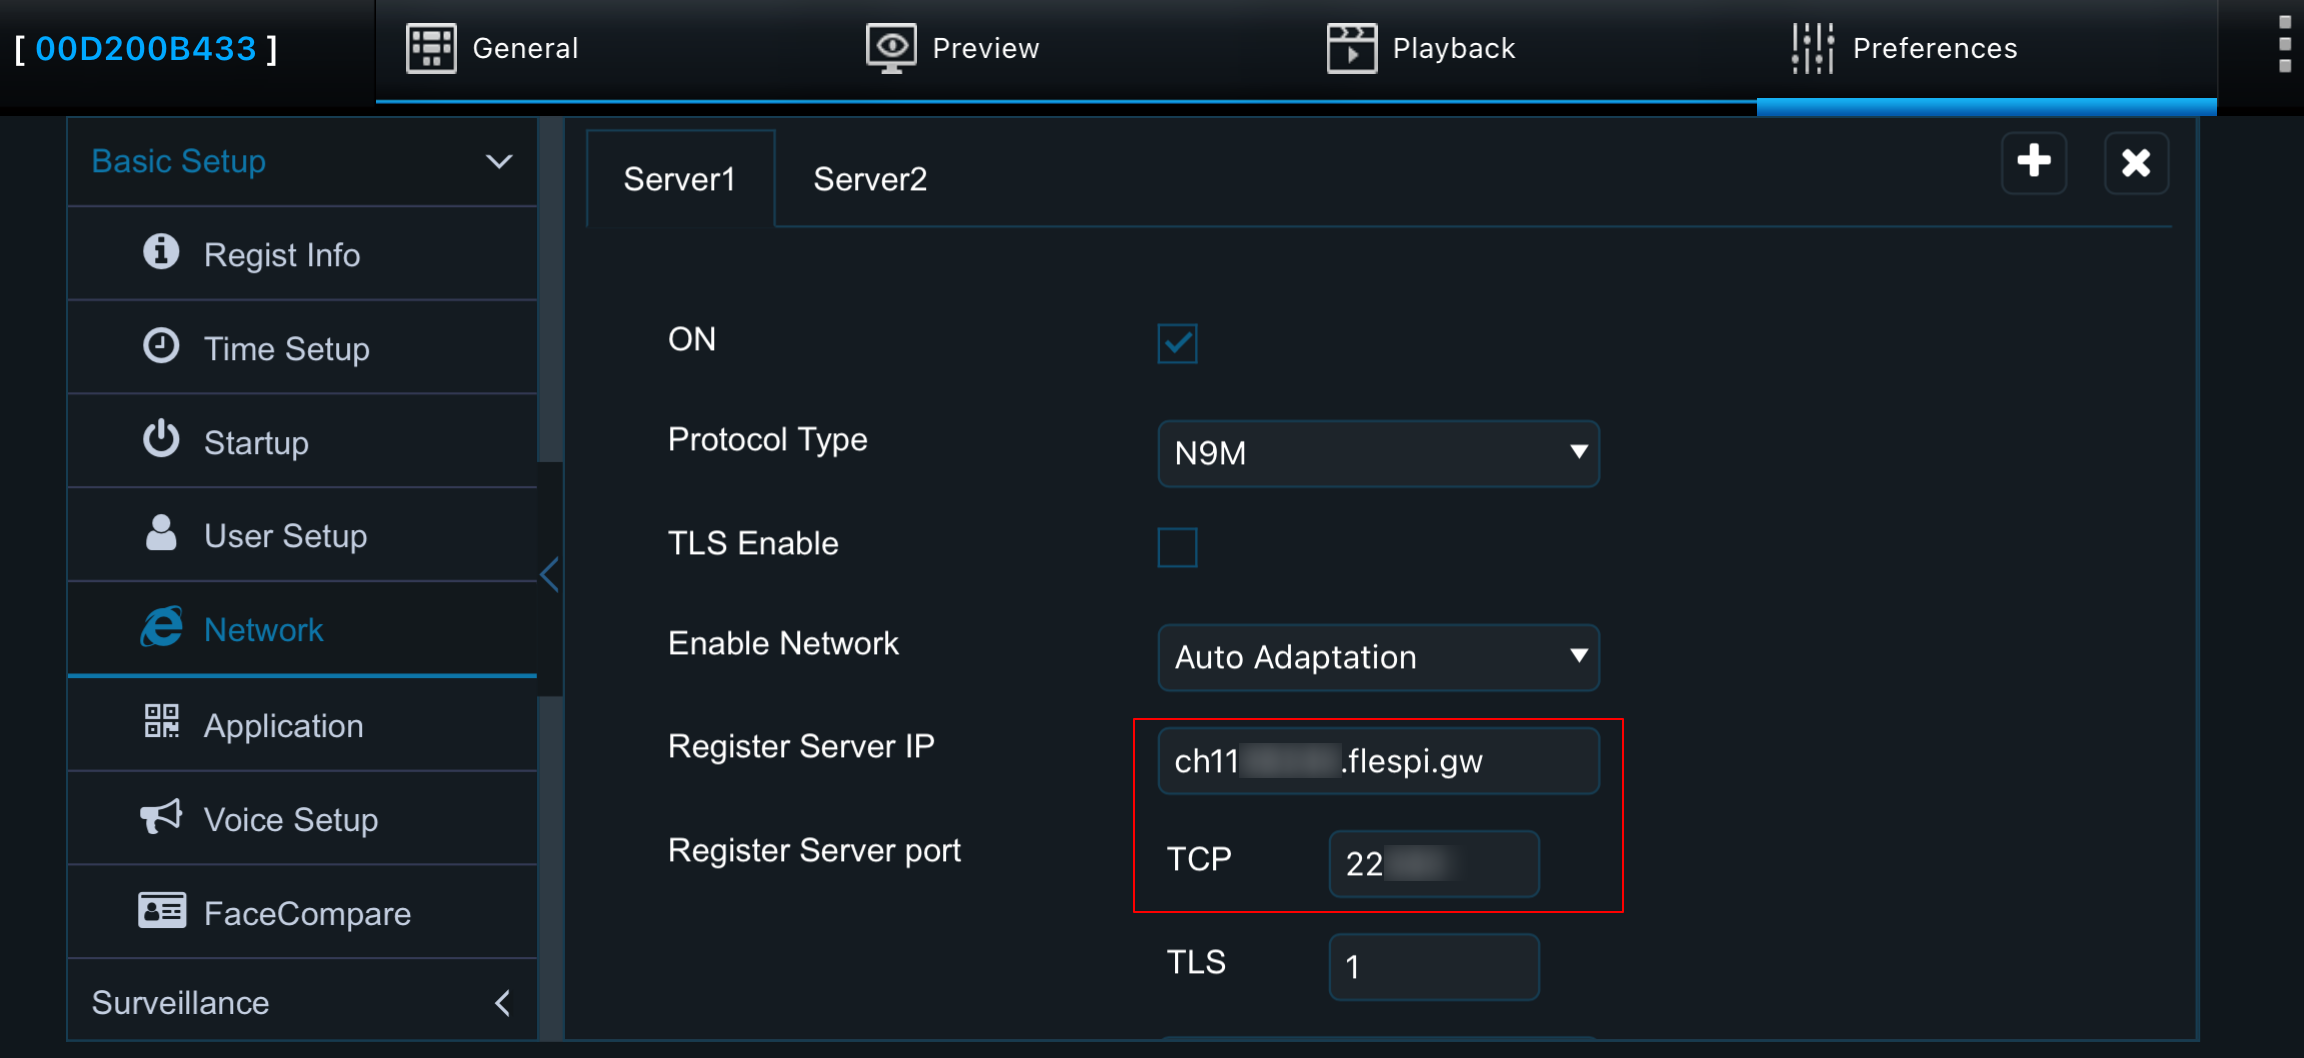
Make a note of the host and port of your flespi channel that you're going to point your device to. Important: the image below indicates where to find the info and is NOT an actual domain/port for you to use (in flespi each channel created by you has its own IP and port).

Streamax provides a dedicated mobile app available for both iOS and Android. This app will assist you not only with basic device setup but also with custom expert features and options.
To configure your device, you'll need to connect your mobile to its Wi-Fi network. When you power on the device, its Wi-Fi module starts in 'client' mode for 180 seconds. During this time, open the app, tap 'Search' on the main screen, and locate the device's Wi-Fi network in the list. If you're not quick enough, simply restart the device and try again.
When connected successfully, you log in with your credentials and proceed to Preferences > Network > Server1. Here fill in the ‘Register Server IP’ and ‘Register Server port’ fields with flespi ‘Host’ and ‘Port’ values correspondingly. Don't forget to click on 'Save'.
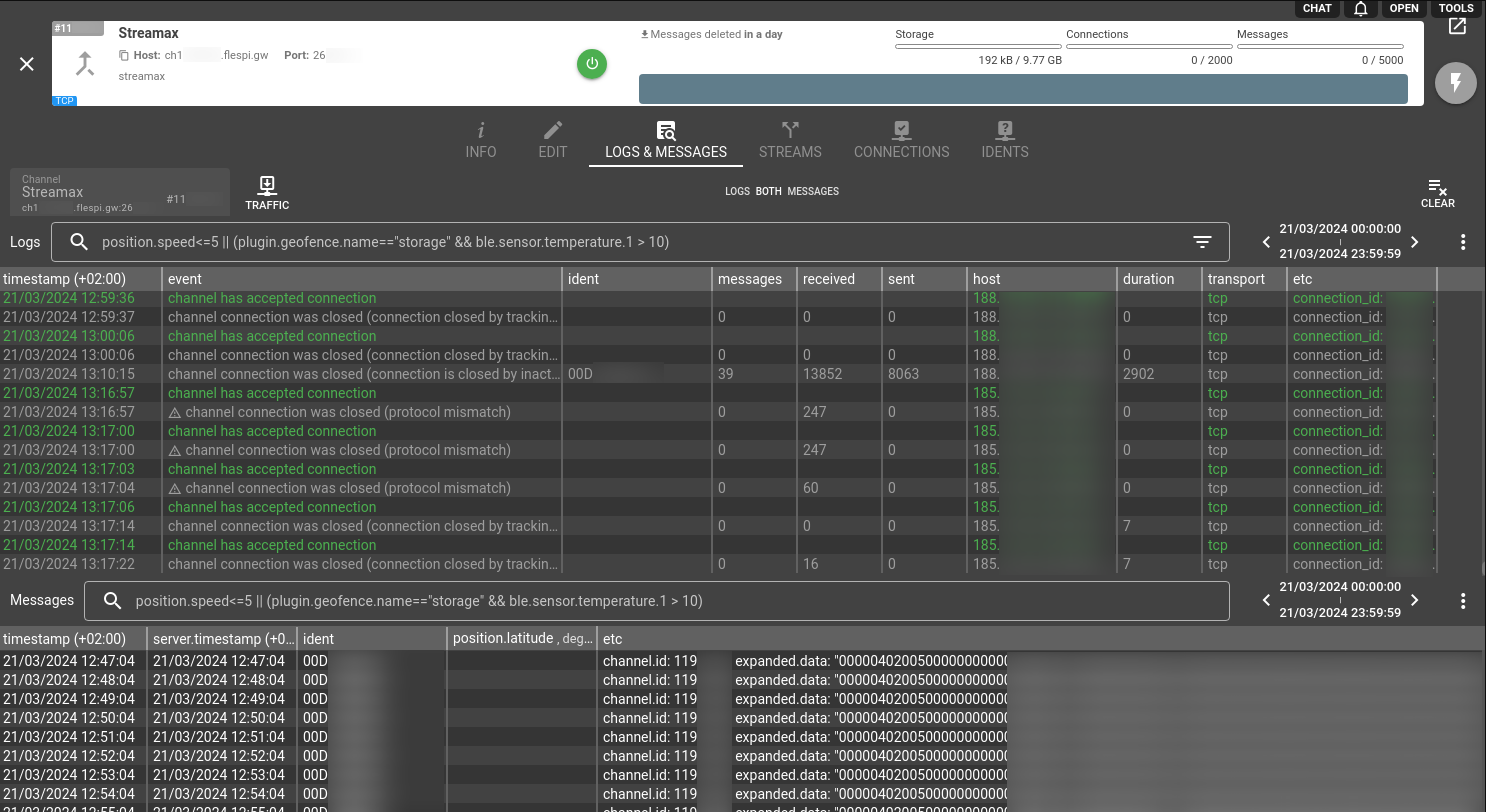
Now open the Logs & Messages tab for your channel to see if messages are coming in. Commonly the traffic will show up in a couple of minutes as you've set it all up and left 'admin' mode.
4. Create a device in flespi
Flespi is a device-centric platform. It means that most of the platform functionality is available on the device level. To add a new device you need to open the flespi panel and follow through Telematics Hub > Devices, then click on the '+' button.
Choose the device model, and use the serial number or the 'ident' value (look up in the channel's Logs & Messages) to fill in the ‘Serial Number as ident’ field. As we’re setting up a video device you’ll see the Cameras section:
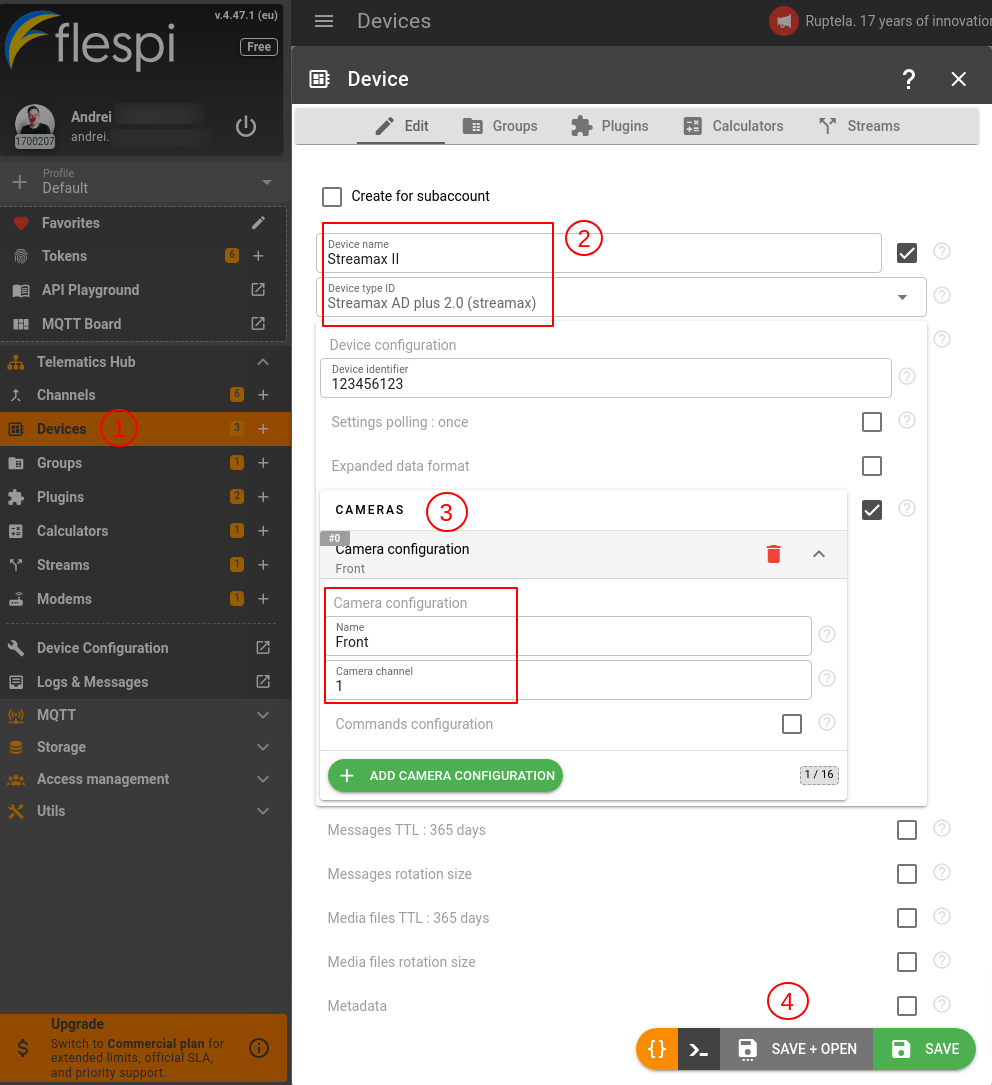
Depending on the device specifications you can set up other cameras to have all of them available - one camera per ‘Camera channel’. Two pre-configured cameras will have dedicated labels on the 'camera' icons on the Device > Media tab. Click ‘SAVE + OPEN’ when you’re ready.
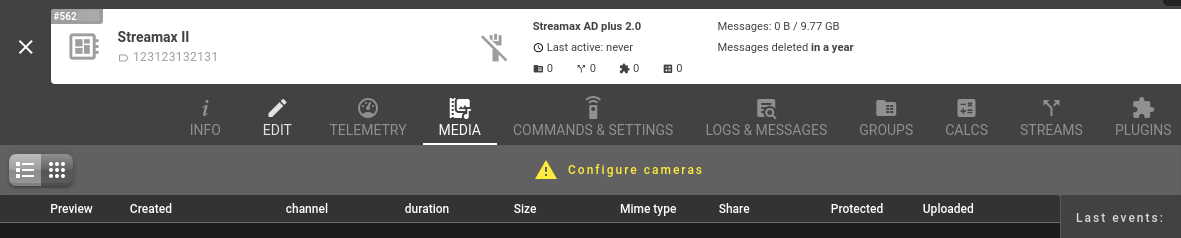
NOTE: if you don't assign a camera you won't see control buttons on the Media tab but a warning message. You need to add at least one and the warning message disappears.
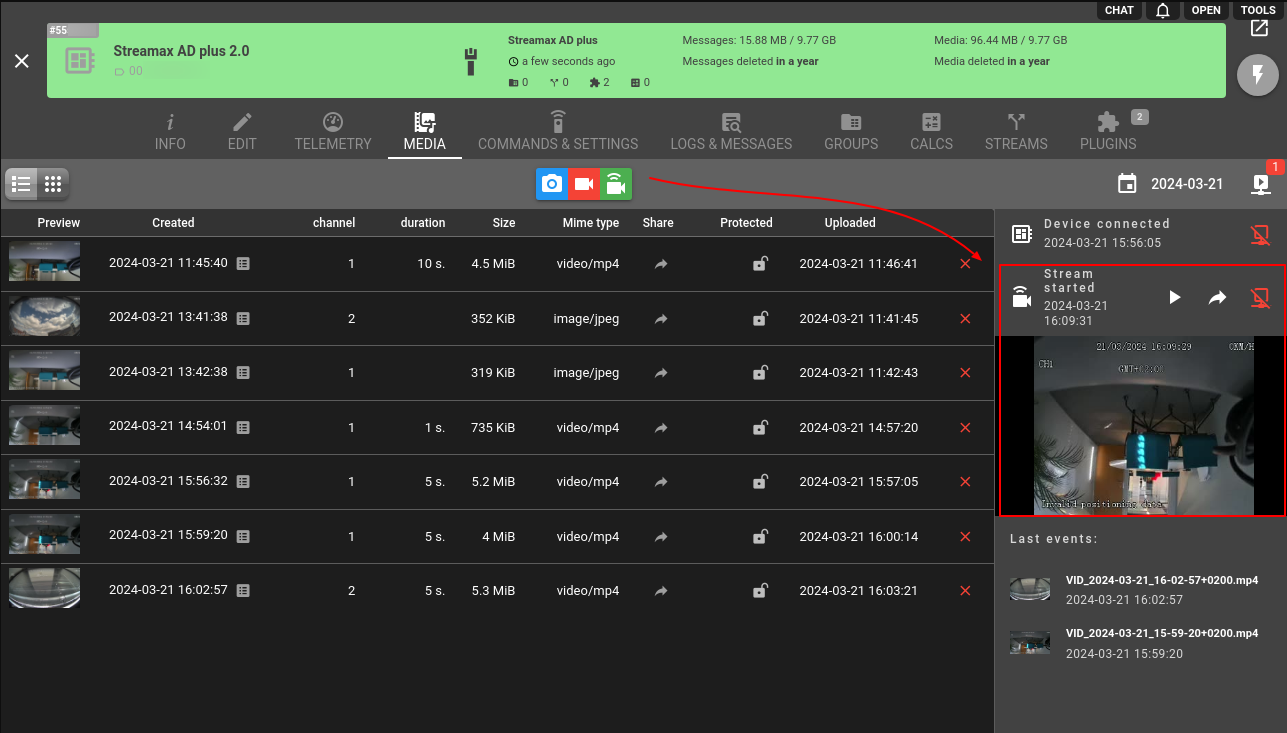
5. Manage your media in the dashboard
To take a snapshot, capture a video, or start a live stream you can use the Mediabox UI tool with its intuitive control interface or run specific commands on the Commands & Settings tab. Also, in Mediabox you can easily access and manage all the files stored (preview snapshots, playback recorded video, protect files from automatic deletion, share them, etc.).
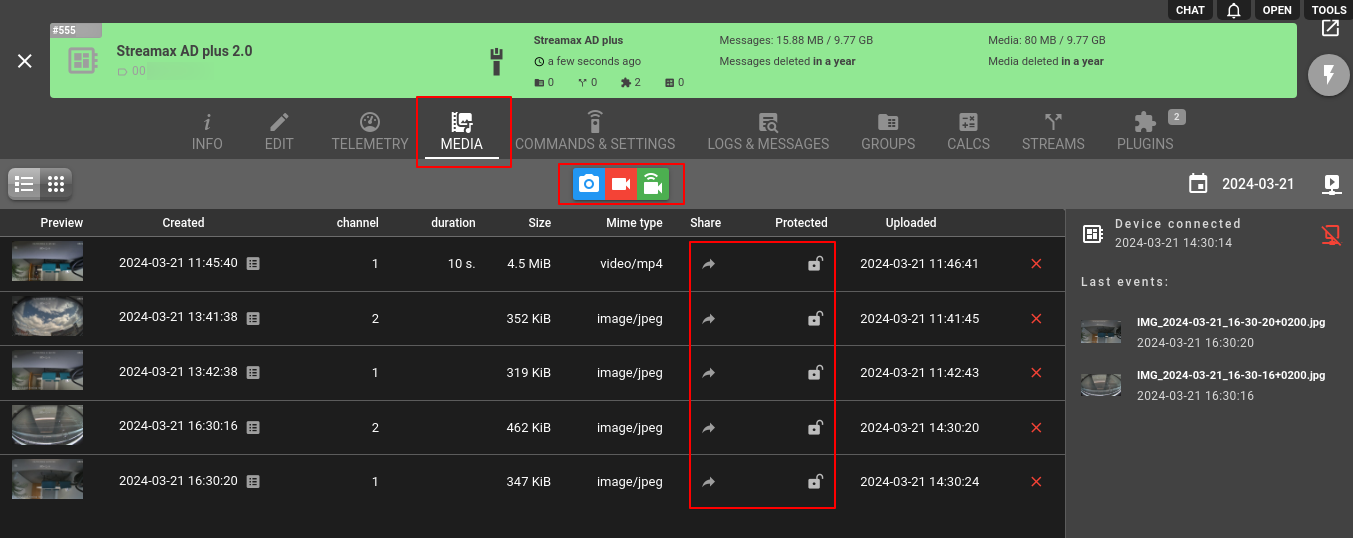
5.1. How to request a video
To request a video you need to click on a red camera icon on the Media tab and the following dialog box will show up:
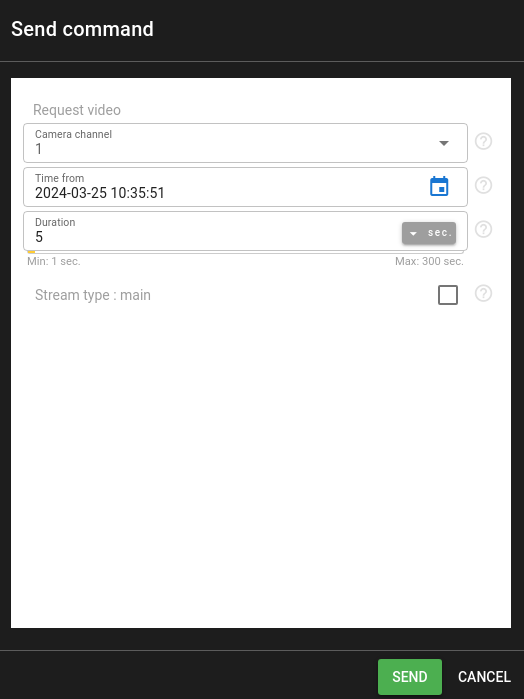
Select the Camera channel, and specify Time from and Duration (Stream type parameter is optional and set to 'Main' by default). When the command is sent to the device successfully you’ll see a recorded file appear on the list and the Last events pane.
Also, you can use the standard command named 'request_video' on the Commands & Settings tab, but it's strongly advised to use the command queue (not real-time command), as it's difficult to predict how long it will take for a device to process the request and respond, considering the network/cellular bandwidth.
This command may contain manufacturer-specific options, providing fine-tuning capabilities when necessary, but always includes three required options:
- camera channel index ("channel" property),
- video recording time ("from" property),
- clip duration ("duration" property).
The request will look like the following:
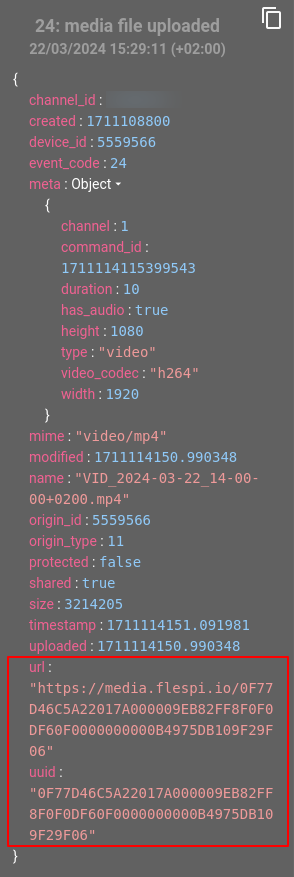
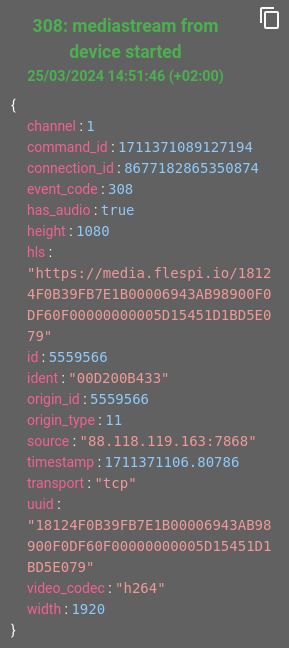
curl -X POST --header 'Authorization: FlespiToken XXXXXXXXX' -d '[{"name":"request_video","properties":{"channel":1,"duration":10,"from":1711108800,"streamtype":"main"},"ttl":600}]' 'https://flespi.io/gw/devices/{dev-selector}/commands-queue'- With this call, you instruct flespi to download video recorded at 1711108800 (in GMT this is March 22, 2024 2:00:00 PM) and duration of 10 seconds.
- This command will stay in the command queue for up to 10 min (600 seconds) waiting for the device to be connected and be able to serve this command.
- Once the command is executed you get full information about the video clip with UUID and a direct link.
You can find more info about video commands and how to use them here.
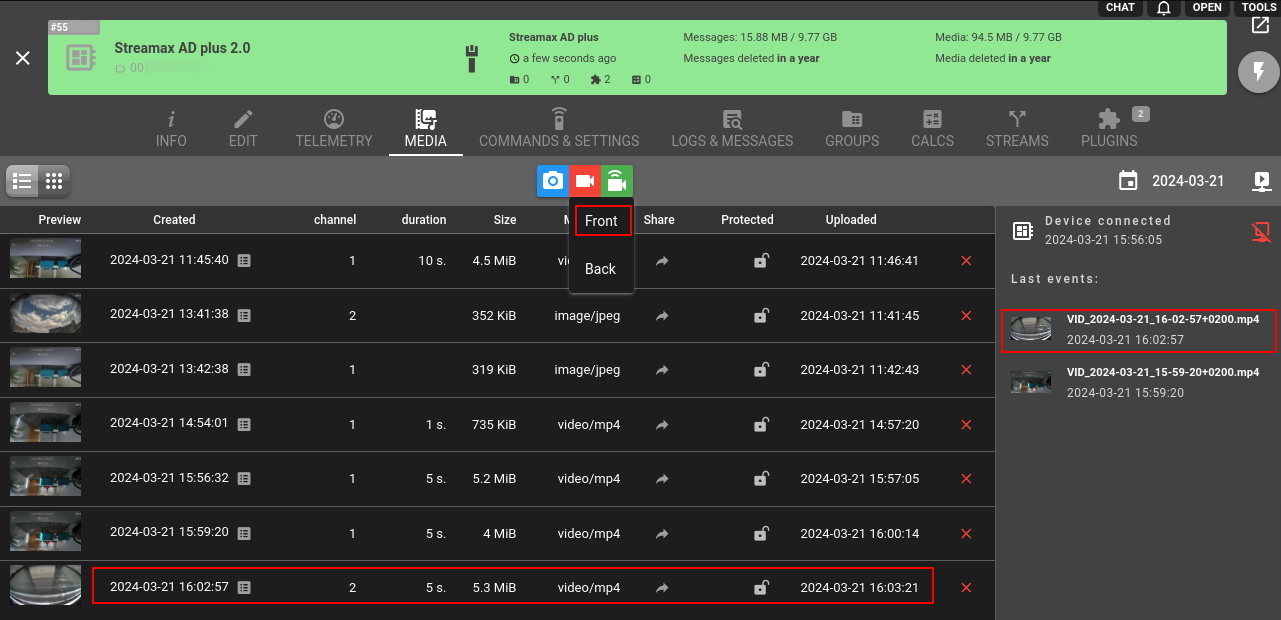
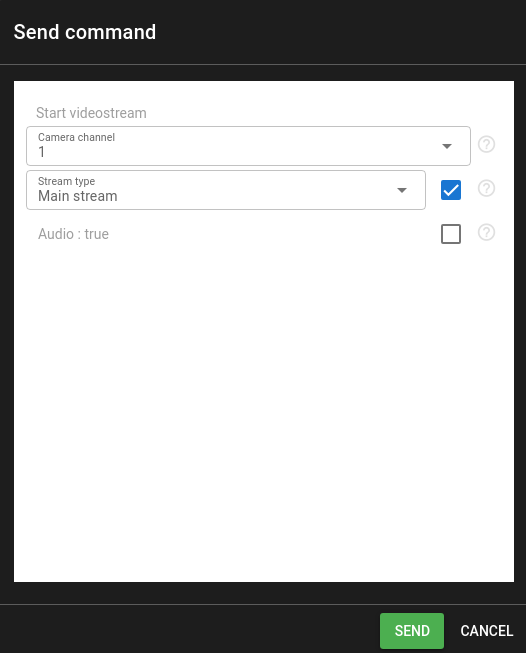
5.2. How to start a live stream
On the Media tab click on the green camera icon. The following dialog box lets you choose the camera channel and stream type. This parameter is tied with protocol specifications, while Streamax provides 'Main stream’ for maximum quality and ‘Substream’ in case a lower screen resolution is required or the network signal is rather poor (it might also help with long delays in performing a request either in GUI or REST API).
As the video stream becomes available, you’ll notice a preview window on the Last events pane. As the stream is not recorded, you won’t see a corresponding file added to the bottom of the file list.
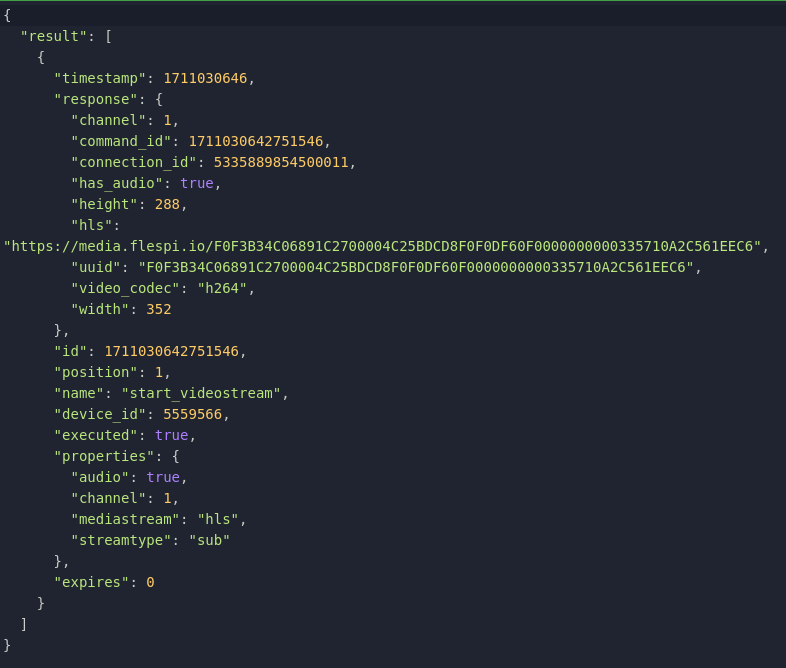
You can also instruct the device to start streaming with the ‘start_videostream’ command on the Commands & Settings tab where the most important option is to select the channel number. The request will look as follows:
curl -X POST --header 'Authorization: FlespiToken XXXXXXXXX' -d '[{"name":"start_videostream","properties":{"mediastream":"hls","streamtype":"sub","channel":1},"timeout":60}]' 'https://flespi.io/gw/devices/{dev-selector}/commands''As the command is executed, you'll see the response with a .m3u8 link to load it into a media player::
Important: The live stream will be automatically stopped after 10 minutes if there's no active browser session or the index file is not requested by any HLS-compatible client. To control your traffic you can stop a stream in these ways:
- click on a particular display-crossed icon on the Media tab,
- request to drop the media connection, where you need to provide your 'device_id' and 'connection_id', which can be found in the command response log:
curl -X DELETE --header 'Authorization: FlespiToken XXXXXXXXX' 'https://flespi.io/gw/devices/{dev-selector}/connections/{conn-selector}'5.3. How to playback video
In addition to video file download and live video streaming functionality, there is an option to view video files recorded on the device without waiting for their upload to complete.
To start playback you use the command ‘playback_video’. It will require the same set of options as for ‘request_video’ described above, but its result will be different.
curl -X POST --header 'Authorization: FlespiToken XXXXXXXXX' -d '[{"name":"playback_video","properties":{"channel":1,"duration":60,"from":1711371600},"ttl":60}]' 'https://flespi.io/gw/devices/{dev-selector}/commands-queue'Instead of waiting for the whole video file upload before finishing the command with a result, a HLS live stream will be started instead, from the very beginning of the video file, and the command result will contain a link to that live stream. Thus you can start displaying a video file before its upload finishes.
5.4. How to get the list of recorded videos
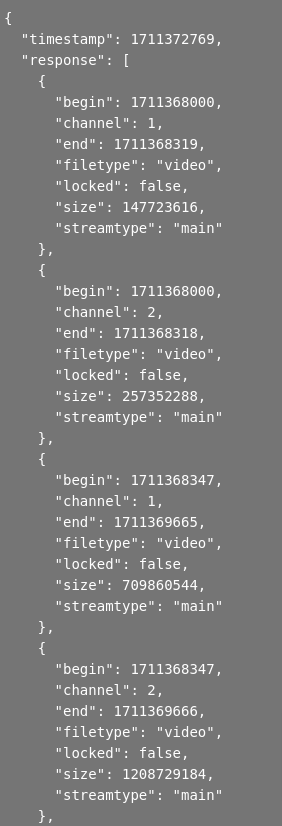
You can use the ‘video_timeline’ command to ask the device for the list of available time intervals with video data recorded on the MDVR device storage. This command requires two options - time from and time to.
curl -X POST --header 'Authorization: FlespiToken XXXXXXXXX' -d '[{"name":"video_timeline","properties":{"from":1711358244,"to":1711358326},"timeout":60}]' 'https://flespi.io/gw/devices/{dev-selector}/commands'In the result, you will receive a JSON array with objects representing every available interval with the recorded video.
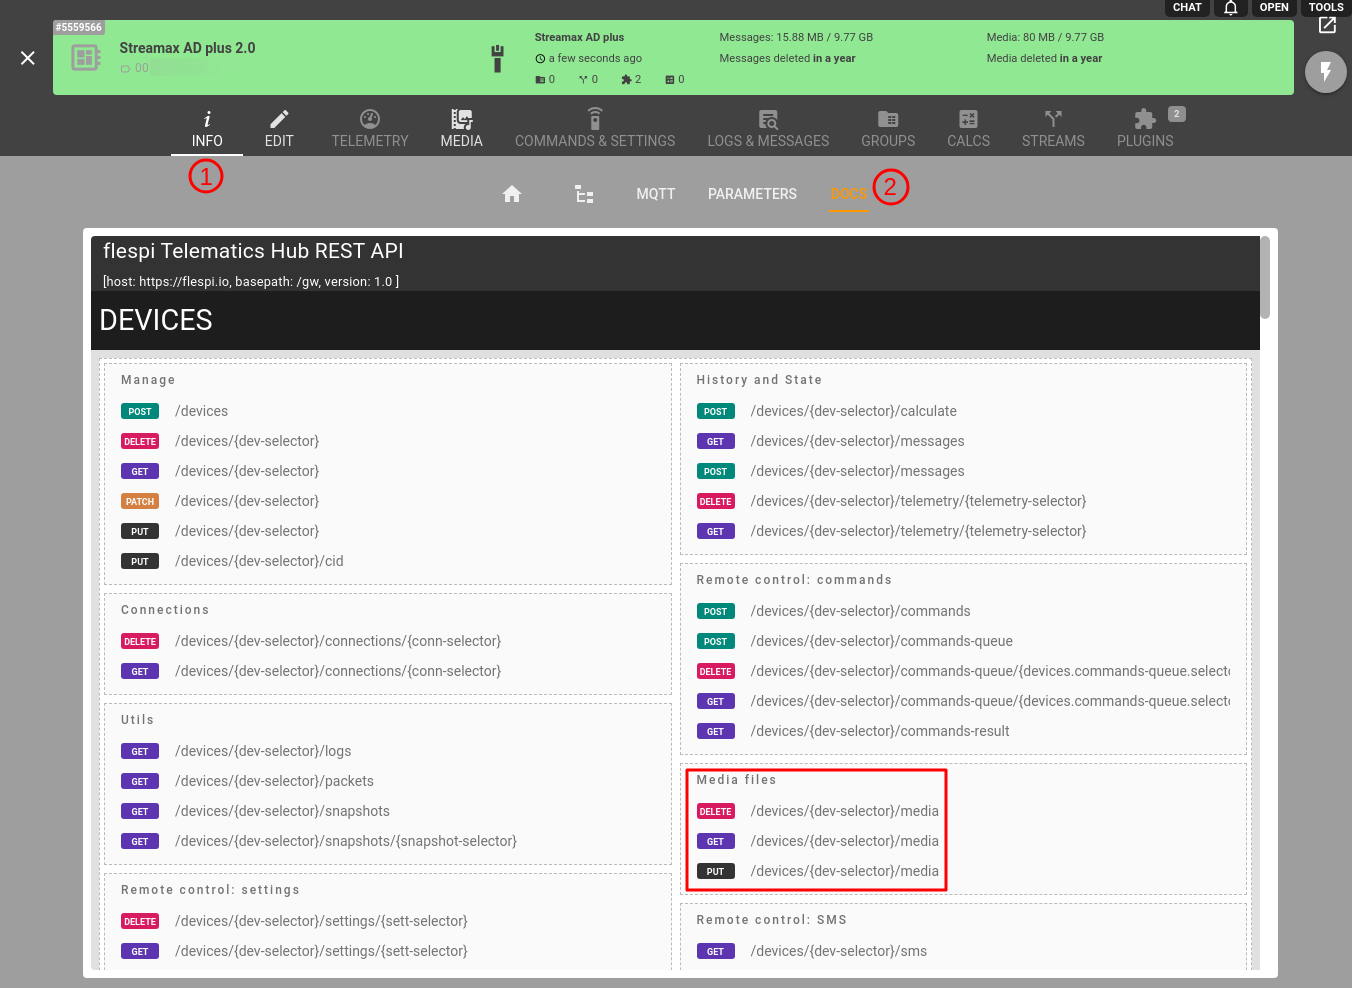
6. Access your media via API
In the main menu follow Telematics Hub > Devices > 'Your Streamax Device' > Info > Docs. The following operations are available for each media device:
- Delete all or specific files.
- Search for some files or list all files.
- Add your own set of properties to a file, or protect/unprotect it from being deleted automatically.
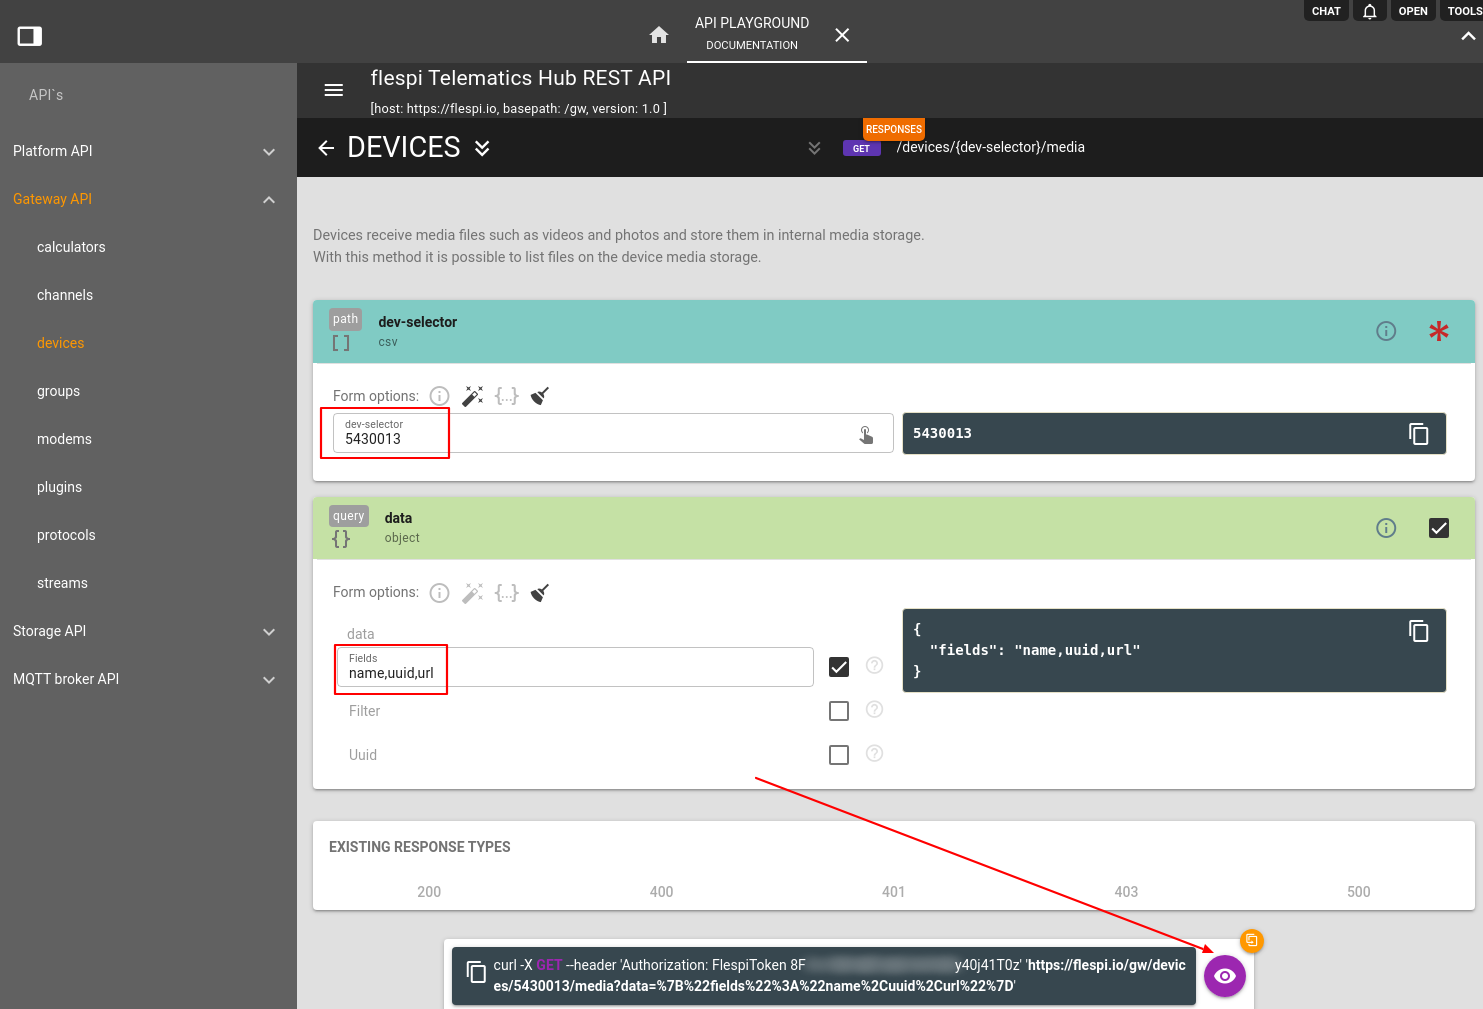
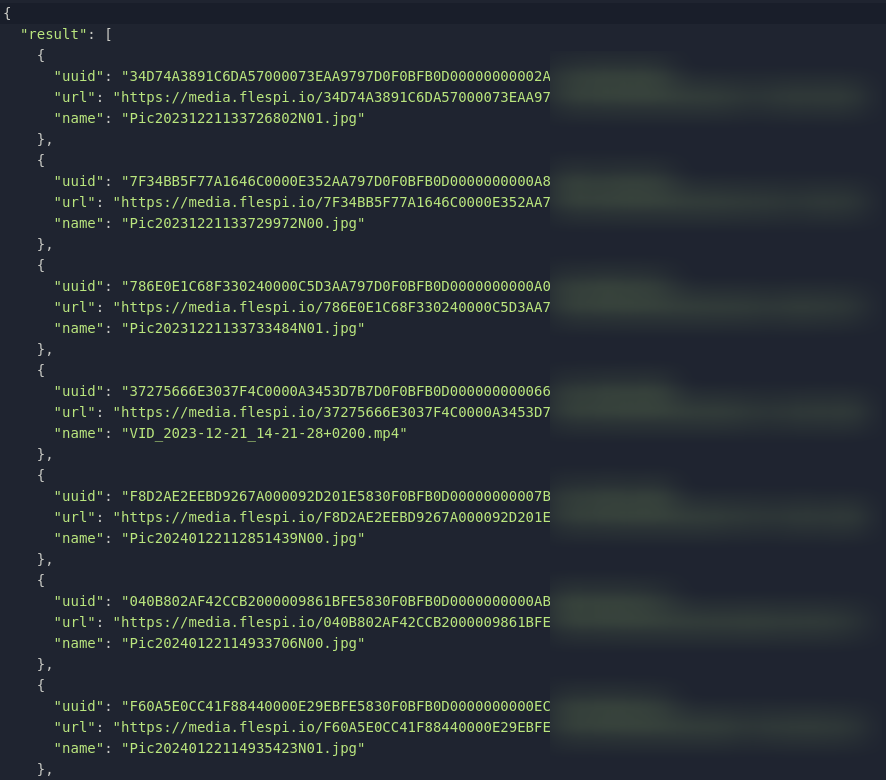
For example, you need to get the list of all media files stored in the device with their URLs and UUIDs.
Use GET /devices/{dev-selector}/media request. Fill in 'dev-selector' with your 'device_id', add 'name,uuid,url' to the 'data' field, and click on the 'eye' icon to run.
The response will look as follows:
Hint: as all files have a unique UUID property, which is used to identify the file, there's no need to use tokens for authorization — you just use it as is.
That's it. :) Got questions? We're just one click away to assist you in the chat.
What's next?
- Take a look at our API basics.
- Explore a variety of data access options.
- Learn how to integrate video telematics into your application.
- Manage device settings and control outputs remotely via a universal web-based configuration tool or directly via API.
- Push the data to Amazon AWS IoT, Google IoT Cloud, Microsoft Azure IoT, or your own server.